")
")
")
")
")
")
")
")
")
")
")
")
")
In this follow-up to the Getting Started guide, you’ll have a chance to review what you’ve learned about Arquillian by exploring a slightly more complex example. After reading this guide, you’ll be able to:
- Write an Arquillian test that uses CDI and EJB working together
- Execute an Arquillian test in a remote container
- Debug an Arquillian test inside a remote container
As part of learning these skills, you’ll be adding additional Maven profiles to your build. When activated, these profiles will get Arquillian to run the tests in a remote container (i.e., application server). That means you’ll be testing the real deal. No mocks. Not even embedded runtimes! And since you’ve done most of the hard work in the first guide, it won’t take long to get there.
Assumptions
This guide assumes you have added the Arquillian infrastructure to your project and have written and executed at least one Arquillian test. If you haven’t yet, please read the Getting Started guide to become familiar with the basics of Arquillian. You’ll also need the prerequisite software mentioned in that guide.
Create the Components
In this guide, we’ll be creating a very basic backend for a shopping application. We’ll use a basket component to store the visitor’s selected items and an order repository component to store and retrieve placed orders. We’ll implement these components using CDI and EJB, respectively. We can immediately start using these two programming models since we already have the Java EE 6 API on the classpath. (Refer to the Getting Started guide for instructions on how to add this API to your project).
Let’s start with the component that moves the orders to and from persistent storage. Following good software design, and to simplify testing, we’ll begin by defining an interface that defines the contract. In your IDE, create a new local EJB interface named OrderRepository and populate it with the following contents:
package org.arquillian.example;import java.util.List; import javax.ejb.Local;@Local public interface OrderRepository { void addOrder(List<String> order); List<List<String>> getOrders(); int getOrderCount(); }
We’ll worry about the implementation a bit later. Let’s skip to how we are going to use this contract.
As visitors browse the site, they’ll put items in their baskets to purchase. To model this scenario, we’ll use a CDI bean that is associated with the visitor’s HTTP session. This component will then delegate to the OrderRepository EJB when the visitor wants to purchase the selected items.
In your IDE, create a class named Basket and bind it to the session context by adding the scope annotation @SessionScoped, as shown below:
package org.arquillian.example;import java.io.Serializable; import java.util.ArrayList; import java.util.Collections; import java.util.List;import javax.annotation.PostConstruct; import javax.ejb.EJB; import javax.enterprise.context.SessionScoped;@SessionScoped public class Basket implements Serializable { private static final long serialVersionUID = 1L; private List<String> items;@EJB private OrderRepository repo;public void addItem(String item) { items.add(item); }public List<String> getItems() { return Collections.unmodifiableList(items); }public int getItemCount() { return items.size(); }public void placeOrder() { repo.addOrder(items); items.clear(); }@PostConstruct void initialize() { items = new ArrayList<String>(); } }
As you can see, we are wiring EJB to a CDI bean, precisely the integration we want to test!
Implement in Phases
We aren’t quite ready to write a test because we don’t have an implementation of the OrderRepository yet.
For the purpose of this example, let’s assume that the OrderRepository is being implemented by another team (or in another iteration). Here’s where the micro-deployment feature of Arquillian really stands out. We can create an in-memory implementation as an EJB singleton and bundle it in the test archive to get a working application in the short term. (We may even decide to keep this implementation for the purpose of testing this boundary).
Create the class SingletonOrderRepository in your test classpath and populate it with the code shown below:
package org.arquillian.example;import java.util.ArrayList; import java.util.Collections; import java.util.List;import javax.annotation.PostConstruct; import javax.ejb.Lock; import javax.ejb.LockType; import javax.ejb.Singleton;@Singleton @Lock(LockType.READ) public class SingletonOrderRepository implements OrderRepository { private List<List<String>> orders;@Override @Lock(LockType.WRITE) public void addOrder(List<String> order) { orders.add(order); }@Override public List<List<String>> getOrders() { return Collections.unmodifiableList(orders); }@Override public int getOrderCount() { return orders.size(); }@PostConstruct void initialize() { orders = new ArrayList<List<String>>(); } }
The added bonus of this implementation is that we get a chance to play around with the new singleton feature of EJB 3.1 in an Arquillian sandbox. That’s why we like to say that Arquillian is a learning environment in addition to being a testing tool.
Now we are ready to write the Arquillian test.
Write a Test
We are now going to write a test that simulates adding items to an instance of Basket, uses that instance to place an order and then validates the order is processed and stored into the single OrderRepository instance.
Of course, we will only be testing the in-memory implementation. You’ll learn how to write a test that uses a database in the Testing Java Persistence guide. You can then revisit this guide and flesh out the JPA implementation.
Create the class BasketTest and annotate it with @RunWith(Arquillian.class) to make it an Arquillian test:
package org.arquillian.example;import org.jboss.arquillian.junit.Arquillian; import org.junit.runner.RunWith;@RunWith(Arquillian.class) public class BasketTest { }
Next we’ll define a test archive that includes the basket, the order repository interface and its singleton implementation. We also need an empty beans.xml file to activate CDI (EJB is automatically activated). Notice how we have complete control over the classpath by explicitly defining what goes into the archive.
package org.arquillian.example;import org.jboss.arquillian.container.test.api.Deployment; import org.jboss.arquillian.junit.Arquillian; import org.jboss.shrinkwrap.api.ShrinkWrap; import org.jboss.shrinkwrap.api.asset.EmptyAsset; import org.jboss.shrinkwrap.api.spec.JavaArchive; import org.junit.runner.RunWith;@RunWith(Arquillian.class) public class BasketTest { @Deployment public static JavaArchive createDeployment() { return ShrinkWrap.create(JavaArchive.class, "test.jar") .addClasses(Basket.class, OrderRepository.class, SingletonOrderRepository.class) .addAsManifestResource(EmptyAsset.INSTANCE, "beans.xml"); } }
All that’s left is to inject the basket and order repository into the test case and test their interaction. We’ll be injecting the EJB interface, not the implementation. The EJB container will automatically find the implementation of the interface to use.
By default in JUnit, @Test methods are executed in a non-determinant order. Arquillian’s JUnit integration provides an @InSequence annotation that can be used to set an explicit order of execution. We’ll use @InSequence in this test case to place two orders in the first test method, then ensure the repository still contains those two items in the second test method.
package org.arquillian.example;import javax.ejb.EJB; import javax.inject.Inject;import org.jboss.arquillian.container.test.api.Deployment; import org.jboss.arquillian.junit.Arquillian; import org.jboss.arquillian.junit.InSequence; import org.jboss.shrinkwrap.api.ShrinkWrap; import org.jboss.shrinkwrap.api.asset.EmptyAsset; import org.jboss.shrinkwrap.api.spec.JavaArchive; import org.junit.Assert; import org.junit.Test; import org.junit.runner.RunWith;@RunWith(Arquillian.class) public class BasketTest { @Deployment public static JavaArchive createDeployment() { return ShrinkWrap.create(JavaArchive.class, "test.jar") .addClasses(Basket.class, OrderRepository.class, SingletonOrderRepository.class) .addAsManifestResource(EmptyAsset.INSTANCE, "beans.xml"); }@Inject Basket basket;@EJB OrderRepository repo;@Test @InSequence(1) public void place_order_should_add_order() { basket.addItem("sunglasses"); basket.addItem("suit"); basket.placeOrder(); Assert.assertEquals(1, repo.getOrderCount()); Assert.assertEquals(0, basket.getItemCount());basket.addItem("raygun"); basket.addItem("spaceship"); basket.placeOrder(); Assert.assertEquals(2, repo.getOrderCount()); Assert.assertEquals(0, basket.getItemCount()); }@Test @InSequence(2) public void order_should_be_persistent() { Assert.assertEquals(2, repo.getOrderCount()); } }
The test is written. Now we need to get setup to run it.
Add the Remote Containers
The test we’ve written uses both CDI and EJB. That combination pushes the boundaries of what an embedded runtime (like Weld Embedded or OpenEJB Embedded) can provide. It’s simpler to use a compliant Java EE container anyway. Plus, it gives us more accurate test results. So we’ll leave the embedded containers behind for now.
In the previous guide, we used both embedded and managed containers. In both cases, Arquillian must start the container when the test suite begins and stop it when the tests are finished. What if you already have a container started (or you are willing to start one for the purpose of testing)? That’s obviously going to be the fastest way to run the tests. Even if the container starts very fast, nothing beats no startup at all.
Remote containers provide an ideal development environment for integration testing. They also make debugging the test very straightforward, as you’ll see later. Since there is no reference to the container in the test, using a remote container during development does not prevent you from using a managed container for continuous integration. In fact, managed containers are best suited for continuous integration environments.
The term remote refers to a separate process, not necessarily a separate machine, though it supports both scenarios.
A remote container is a standalone process to which Arquillian deploys using the container’s client deployment APIs. Therefore, the libraries you need are:
- APIs of the programming model (which only need to be packaged if the container does not provide them)
- The Arquillian remote container adapter
- The client deployment APIs for communicating with the container process
In your Maven pom.xml file, add two new profiles inside the <profiles> element. The first profile uses a remote JBoss AS 7.1 container:
<!-- clip -->
<profile>
    <id>arquillian-jbossas-remote</id>
    <dependencies>
        <dependency>
            <groupId>org.jboss.spec</groupId>
            <artifactId>jboss-javaee-6.0</artifactId>
            <version>1.0.0.Final</version>
            <type>pom</type>
            <scope>provided</scope>
        </dependency>
        <dependency>
            <groupId>org.jboss.as</groupId>
            <artifactId>jboss-as-arquillian-container-remote</artifactId>
            <version>7.1.1.Final</version>
            <scope>test</scope>
        </dependency>
        <dependency>
            <groupId>org.jboss.arquillian.protocol</groupId>
            <artifactId>arquillian-protocol-servlet</artifactId>
            <scope>test</scope>
        </dependency>
    </dependencies>
</profile>
<!-- clip -->
By default, JBoss AS 7 deploys test archives to the server using the JMX protocol. We’ve gone ahead and added the dependency for the Servlet protocol in the arquillian-jbossas-managed profile just so it’s there if you need to use it in the future. See this FAQ for instructions on how to switch to it.
The second profile uses a remote GlassFish 3.1.2 container:
<!-- clip -->
<profile>
    <id>arquillian-glassfish-remote</id>
    <dependencies>
        <dependency>
            <groupId>org.jboss.spec</groupId>
            <artifactId>jboss-javaee-6.0</artifactId>
            <version>1.0.0.Final</version>
            <type>pom</type>
            <scope>provided</scope>
        </dependency>
        <dependency>
            <groupId>org.jboss.weld</groupId>
            <artifactId>weld-api</artifactId>
            <version>1.1.Final</version>
            <scope>test</scope>
        </dependency>
        <dependency>
            <groupId>org.jboss.arquillian.container</groupId>
            <artifactId>arquillian-glassfish-remote-3.1</artifactId>
            <version>1.0.0.CR3</version>
            <scope>test</scope>
        </dependency>
    </dependencies>
</profile>
<!-- clip -->
The remote GlassFish adapter uses Jersey to communicate with the container via JAX-RS (REST), which is pulled in as transitive dependency. The Weld API is required for unmarshalling exceptions returned by the in-container tests.
Once you’ve added the profiles to the pom.xml, right click on the project in Eclipse and select Maven > Update Project Configuration. If the project is showing compiler errors, you need to activate one of the profiles.
Recall that there are two ways to activate a Maven profile in Eclipse (assuming you are using the Maven Integration for Eclipse):
- Manual configuration (standard approach)
- Maven profile selector (JBoss Tools)
Refer to the Getting Started guide for instructions on how to activate a profile. Once you’ve activate the profile, the project should compile cleanly.
The remote container adapters expect the container to be running. Therefore, let’s get the containers setup so that we can start them from the comfort of the IDE before we run the test.
Control the Servers
The easiest way to manage the remote containers is to set them up in your IDE. If you’re a more of a commandline person, you can skip this step and start the servers using the appropriate startup scripts.
We’ll show you how to add the server (container) controls in Eclipse. The process is similar for other IDEs. For Eclipse, you’ll need both JBoss Tools and the GlassFish Java EE Application Server Plugin, both of which are available in the Eclipse MarketPlace.
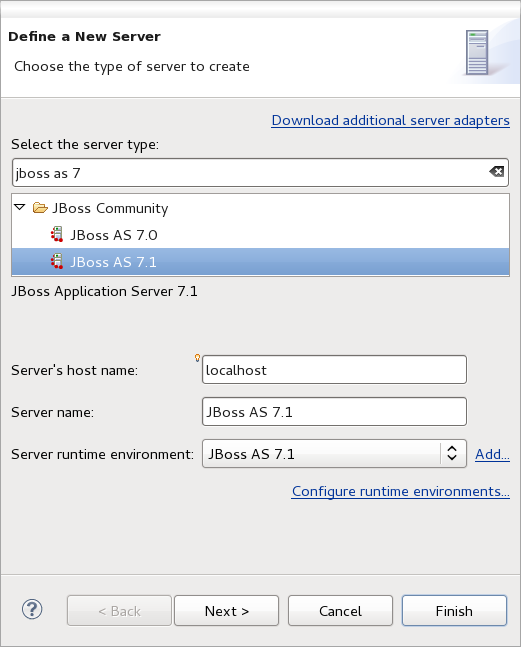
In Eclipse, select Window > Show View > Servers from the main menubar. Once the view opens, right click and select New > Server. Create one server control for JBoss AS 7.1:
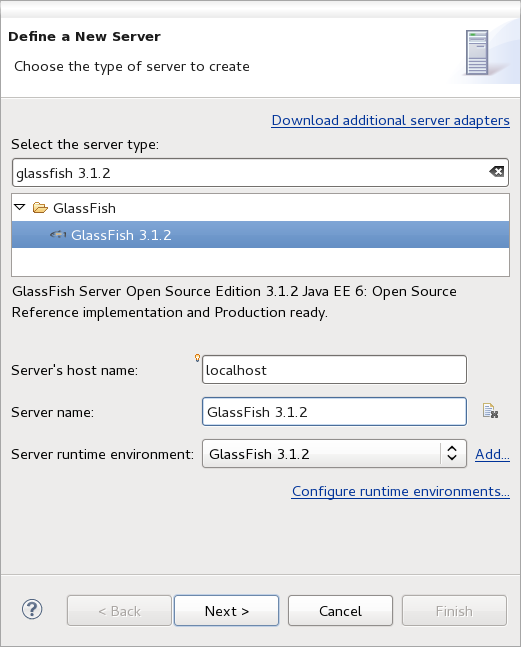
and another for GlassFish 3.1.2:
The wizard for JBoss AS requires you to select an existing installation. The wizard for GlassFish 3.1.2 provides an option to download and extract the distribution automatically.
Once you have completed the wizard for each container, you should see them appear in the server view:
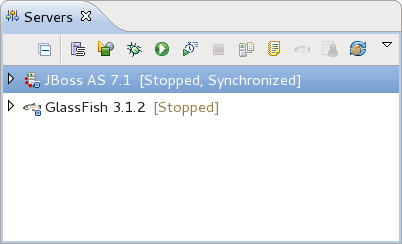
To start a server, select the entry (as shown in the graphic above) and click the green play icon in the toolbar.
Arquillian assumes the containers are running on their default ports. If you have changed the ports, you can use arquillian.xml to specify the ports you are using for each container. Consult the reference guide for details.
Now that you’ve got the containers ready and waiting, it’s time to fire the test off to them.
Run the Arquillian Test
To run the Arquillian test, you need to perform three steps:
- Start the remote container
- Activate the Maven profile that adds the corresponding container adapter to the classpath
- Run the test
Let’s start with JBoss AS.
Run the Test on JBoss AS
To run the test on JBoss AS, begin by starting the JBoss AS container. Open the Servers view, select JBoss AS 7.1, then click the green play button. Wait for it to start (it shouldn’t take long).
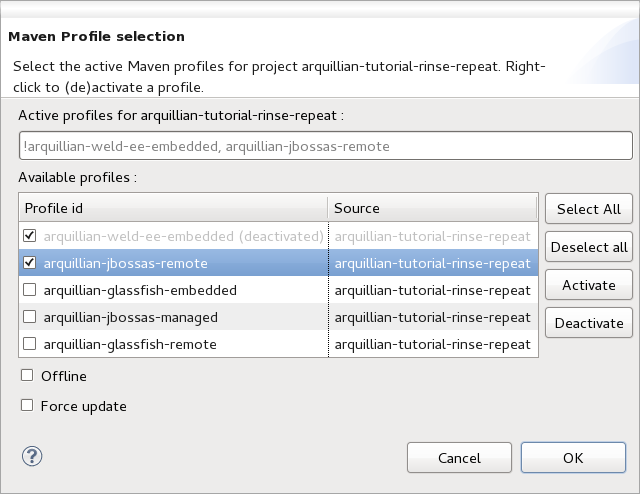
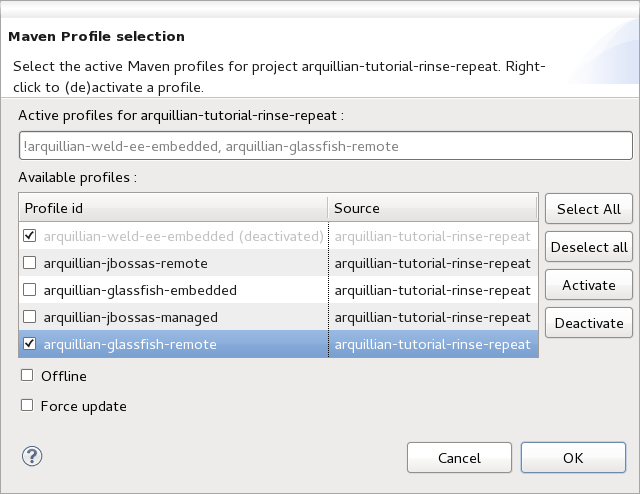
Once that’s up and running, activate the arquillian-jbossas-remote Maven profile using either the Maven properties tab or the JBoss Tools Maven profile selector. The profile editor below shows the correct selection.
Finally, right click on the BasketTest class and select Run As > JUnit Test. You should see a flurry of activity in the Console view and then…a green bar in the JUnit view!
You can also run the test on the commandline using Maven:
$ mvn test -Parquillian-jbossas-remote -Dtest=BasketTestYou should see the following lines printed to the console:
-------------------------------------------------------
T E S T S
-------------------------------------------------------
Running org.arquillian.example.BasketTest
...
Tests run: 2, Failures: 0, Errors: 0, Skipped: 0, Time elapsed: 1.844 sec
Congratulations! You’ve earned your first green bar with Arquillian using a remote container.
You can also inject the OrderRepository EJB using @Inject rather than @EJB. Give it a try!
If you want to verify that the singleton is actually doing its job, go ahead and remove the @Singleton annotation from the SingletonOrderRepository class and replace it with @Stateful. You should see an assertion error when you run the test. Revert the change and the bar will go back to green.
We are done with JBoss AS for the moment, so use the Servers view to stop the server. Now let’s test the exact same test in GlassFish 3.1.2.
Run the Test on GlassFish
To run the test on the standalone GlassFish server, begin by starting the server. Open the Servers view, select GlassFish 3.1.2, then click the green play button. Wait for it to start.
Once that’s up and running, activate the arquillian-glassfish-remote Maven profile using either the Maven properties tab or the JBoss Tools Maven profile selector. Remember to deactivate the arquillian-jbossas-remote profile. The profile editor below shows the correct selection.
Finally, right click on the BasketTest class and select Run As > JUnit Test. You should see a flurry of activity in the Console view and then…a green bar in the JUnit view!
You can also run the test on the commandline using Maven:
$ mvn test -Parquillian-glassfish-remote -Dtest=BasketTestYou should see the following lines printed to the console:
-------------------------------------------------------
T E S T S
-------------------------------------------------------
Running org.arquillian.example.BasketTest
...
Tests run: 2, Failures: 0, Errors: 0, Skipped: 0, Time elapsed: 3.549 sec
Congratulations! You’ve earned another green bar.
You should still be able to run the test on Embedded GlassFish using the profile you setup in the previous guide. Give it a try. You should also be able to debug the test easily.
Of course, debugging the test in an embedded container is easy since it runs in the same process as the test launcher. But what about a remote container?
Debug the Arquillian Test
Debugging a test in a remote container? That seems hard. Surprise! It’s not at all. You only have to modify one of the step above and add one additional step:
- Debug the remote container
- Activate the Maven profile that adds the corresponding container adapter to the classpath
- Set a breakpoint
- Run the test
In the Servers view, you should notice that there is a bug icon right next to the green play button. Click this button to start one of the servers in debug mode. Eclipse automatically connects its debugger to the container.
Set a breakpoint in the addOrder() method on the SingletonOrderRepository bean. Now, run the test again by right clicking and selecting Run As > JUnit Test.
You don’t need to use Debug As > JUnit Test. The test code is running inside the container, which is already being debugged.
The test should halt at the breakpoint. If you are using JBoss AS, you can open the administration console and verify that the test application is currently deployed to the server.
If you browse the stack trace in the Eclipse Debug view, you’ll notice that the server is being controlled over a remote protocol (either JMX or Servlet) and that JUnit has been launched again from inside the container.
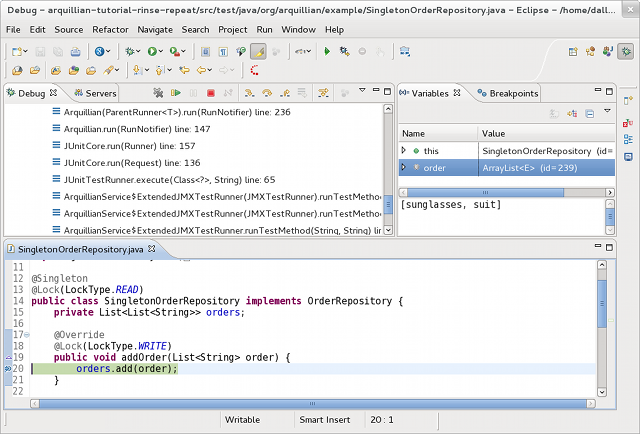
You are now poking around the server from the comfort of your IDE.
If you see the message “Source not found” in the editor view when the debugger stops at the breakpoint, you need to add the project to the debug configuration. Click “Edit Source Lookup Path…”, then click “Add…”, select Java Project, check the box next to your project then click “OK”. Voila! Source code.
Stepping into External Libraries
If you plan to step into a class in an external library (code outside of your application), you need to link the library to its source code.
This configuration is not necessary if you are using a Maven project and the sources for the library are available in the Maven repository. When you hit a breakpoint in a library not yet available locally, give it some time to download and the source code will eventually be revealed. If not, the source is probably not in the repository and you need to read on.
Here are the steps you need to follow to link a library to its source in the debug configuration:
- Select the
Run > Debug Configurations...menu from the main menubar - Select the name of the test class in the JUnit (or TestNG) category
- Select the Source tab
- Click the Add… button on the right
- If the source code is in another project:
- Select Java Project
- Check the project that contains the class you want to debug
- Click OK on the Project Selection window
- If the source code is in a library:
- Select External Archive
- Navigate to the archive that contains the source code (which you have to download, of course)
- Click Close on the Debug Configurations window
You’ll have to complete those steps for any test class you are debugging, though you only have to do it once (the debug configuration sticks around indefinitely).
Debug a Managed Server
Is it possible to debug when using a managed container? You bet! We just need a little extra configuration.
Since Arquillian handles starting and stopping the container, we need to instruct Arquillian to start the container in debug mode. That’s a JVM hint that Arquillian needs to pass to the server, which we’ll supply using a container configuration property.
Before we get to that, we need to think about how we are going to connect the debugger. Unless you’re super speedy with the mouse, you’re going to have a hard time connecting the debugger before Arquillian starts running the tests. Fortunately, we can tell the JVM to wait for the connector to debug before executing the application, in this case JBoss AS. That gives us time to hit the debug button in the IDE to connect to the process.
Here’s the configuration you’ll need to add to the Arquillian configuration descriptor, arquillian.xml, to get Arquillian to start the server in debug mode: (No whitespace is allowed immediately after <property> start tag)
<arquillian xmlns="http://jboss.org/schema/arquillian"
    xmlns:xsi="http://www.w3.org/2001/XMLSchema-instance"
    xsi:schemaLocation="
        http://jboss.org/schema/arquillian
        http://jboss.org/schema/arquillian/arquillian_1_0.xsd">
    <container qualifier="jbossas-managed" default="true">
        <configuration>
            <property name="jbossHome">target/jboss-as-7.1.1.Final</property>
            <property name="javaVmArguments">-Xmx512m -XX:MaxPermSize=128m
                -Xrunjdwp:transport=dt_socket,address=8787,server=y,suspend=y
            </property>
        </configuration>
    </container>
</arquillian>
Notice the suspend=y flag. That tells the process to wait for the debugger to connect. We’ve set the debug port to 8787, which is the port you’ll supply to the debugger configuration. We’ll get to that in a minute. First, let’s get the test started.
- Activate the Maven profile for
arquillian-jbossas-managed(refer to the Getting Started guide) - Run the test
In the Console view, you should notice that Arquillian has started the JBoss AS instance and it’s waiting on the debugger to connect:
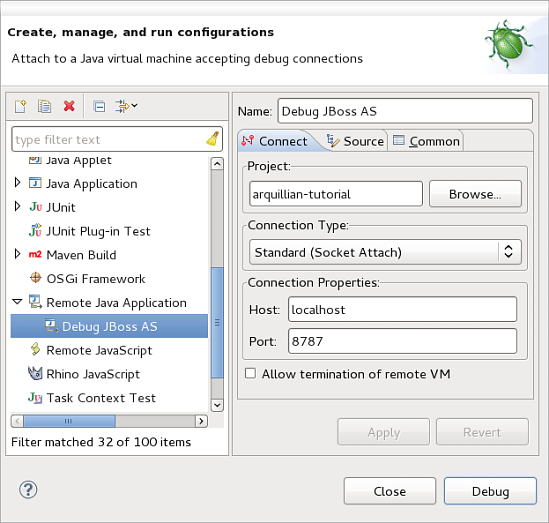
Listening for transport dt_socket at address: 8787All we have to do now is connect a debugger. Here’s how you configure and launch the debugger in Eclipse:
- Select
Run > Debug Configurations...from the main menu - Right click on Remote Java Application and select New
- In the Name field, enter “Debug JBoss AS”
- In the Port field, enter “8787”
- Click the Debug button
Here’s the debug configuration screen showing the debug profile we’ve created:
When you click the Debug button, JBoss AS should resume, then stop again when it hits the breakpoint in your test. Voila! You’re debugging a managed container!
Export the Deployment
Sometimes you need to get a little more insight about what Arquillian is deploying to the server. Fortunately, Arquillian provides a way to export the archive just before deploying it. Assign a relative or absolute directory to the deploymentExportPath property of the <engine> element in arquillian.xml and Arquillian will export the archive to that location for any Arquillian test you run.
<arquillian xmlns="http://jboss.org/schema/arquillian"
    xmlns:xsi="http://www.w3.org/2001/XMLSchema-instance"
    xsi:schemaLocation="
        http://jboss.org/schema/arquillian
        http://jboss.org/schema/arquillian/arquillian_1_0.xsd">
    <engine>
        <property name="deploymentExportPath">target/deployments</property>
    </engine>
</arquillian>
To enable the export for just a single test, use the VM argument arquillian.deploymentExportPath. For example: -Darquillian.deploymentExportPath=target/deployments/.
Now run a test and check the target/deployments folder. You should see a file with the extension .jar, .war or .ear. (Arquillian may have packaged the archive defined in the test inside another archive in order to add some magic). You can inspect the contents of this file using an archive manager. Hopefully the contents of the archive will give you the necessary insight to track down class not found or resource missing exceptions.
At this point, you’ve learned how to run and debug your tests in embedded, remote and managed containers. There’s no holding you back now. Keep on writing real tests and make Ike proud!
Share the Knowledge
Find this guide useful?

There’s a lot more about Arquillian to cover. If you’re ready to learn more, check out the other available guides.
Feedback
Find a bug in the guide? Something missing? You can fix it by forking this website, making the correction and sending a pull request. If you’re just plain stuck, feel free to ask a question in the user discussion forum.
Recent Changelog
- Sep 21, 2017: Fix(scripts) timeout for waiting for timestamp available on pages is by Matous Jobanek