
‘Robust Functional Tests leveraging WebDriver with flavour of neat AJAX-ready API’
1. Overview
Graphene 2 project is designed as a set of extensions for Selenium WebDriver project focused on rapid development and usability in Java environment.
-
API is straight forward and enforces tester to write Ajax-enabled and reusable tests and test abstractions
-
encourages to write tests in a consistent level of abstraction using Page Objects and Page Fragments
-
the code is robust with improved readability
-
supports request guarding and interception
-
exposes fluent Waiting API
-
-
allows WebDriver API interception
-
focuses on test portability across browsers
-
it enables JQuery selectors as a location strategy which is familiar to web development community
-
brings concepts for on-the-fly injection of extensions to a page code (enabling advanced testing features)
-
can take screenshots while testing (see screenshooter extension), and together with other useful info generate neat reports (see Arquillian Recorder extension).
-
integrates with Arquillian Core and Arquillian Drone extension
-
in order to set up browser and container integration easily
-
With all the concepts above, Graphene 2 brings power to space of enterprise Java-based testing.
2. Getting Started
Graphene strongly ties to Arquillian Core and its extensions Containers and Drone to manage lifecycle of the application server, selenium server and Graphene.
In the common scenarios, you only need to choose container you would like to deploy application into and the framework you would like to use for testing.
2.1. Project Setup
2.1.1. Maven Project Dependencies
In order to setup project dependencies, you need to define library dependencies. Refer to Framework Integration Options for more details.
2.2. Starting With Testing From Java
The simplest possible test would look like this:
@RunWith(Arquillian.class)
public class BasicTestCase {

    @Drone
    WebDriver driver;

    @Test
    public void testOpeningHomePage() {
        driver.get("http://www.google.com");

        String pageTitle = driver.getTitle();

        Assert.assertEquals(pageTitle, "Google");
    }
}
This test uses @Drone annotation in order to bring browser to your test case using dependency injection. You can read more about Using Drone, to get information about which instances to use in which situations.
The browser is represented by WebDriver class instance (or its implementations). For more information about what is WebDriver and how it relates to Graphene, look at Using WebDriver.
This is a really simple case and does not really show where Graphene excels.
2.3. Advanced Use Cases
2.3.1. Page Abstractions
On the high level, Graphene allows you to create reusable abstractions in form of Page Objects (the pattern widely known in Selenium community) and Page Fragments, which allows you to encapsulate smaller pieces of your page like JavaScript widgets, UI components or simply forms.
@RunWith(Arquillian.class)
public class TestLogin {

    @Drone
    WebDriver browser;

    @Page
    HomePage homePage;

    @Test(expects = LoginFailedException.class)
    public void testLoginFailed()
        homePage.login("non-existent", "user");
    }
}


public class HomePage {

    @FindBy(".login-form")
    LoginDialog loginDialog;

    @FindBy(".search")
    AutocompleteComponent fulltextSearch;

    @FindBy(".events")
    CalendarComponent eventCalendar;

    /**
     * @throws LoginFailedException when login fails
     */
    public void login(String user, String password) {
       loginDialog.setUser(user);
       loginDialog.setPassword(password);
       loginDialog.login();
    }

   public void switchToEvent(Date date) {
       eventCalendar.clickOnDate(date);
   }
}
You can read more about using reusable Page Abstractions.
2.3.2. Testing AJAX
Second big promise of Graphene is make testing of applications using asynchronous calls heavily (AJAX, WebSocket, …) a simple task.
Graphene allows that by exposing compact syntax for describing conditions which must be met on the page once asynchronous call is finished.
@Test
public void testRegistrationForm()
    guardXhr(nameInput).sendKeys("John");
    assertEquals(nameMessage, "The username was already registered");
}

@Test
public void testRegistrationForm() {
    nameInput.sendKeys("John");
    waitAjax(element(nameMessage).textContains("already registered"));
}
You can read more about Testing AJAX, or can go directly to the documentation of features, which enables that:
Graphene Utility Class
Graphene Utility Class enables compact syntax for waiting and guards.
Request Guards
Request Guards bring simplest conditions like wait for a request to finish (blocking test).
2.4. Under the Hood
Graphene enables way more features on a low level. Using following features may help you write outstanding tests:
2.4.1. Graphene Context
Allows you to obtain current thread-local context of the browser and "inject" it where you need it without reference propagation.
WebDriver browser = GrapheneContext.getContextFor(Default.class).getWebDriver();2.5. Using Drone
Drone is an extension for Arquillian that manages lifecycle of the Selenium Server and Selenium clients as Selenium 1.x, Selenium 2.x and Graphene.
Refer to Using Drone section for more information.
2.6. Running Graphene Tests From An IDE
It is possible to run Graphene tests from any modern IDE. See Arquillian Getting Started Guide for more information about how to run and debug tests in Eclipse.
2.7. Framework Integration Options
In order to setup Graphene’s library dependencies, you need to choose between components:
-
Test Framework (JUnit, TestNG, …)
-
Arquillian Mode (standalone, container)
2.7.1. Test Framework Options
For Graphene to fluently work with JUnit and TestNG, you need to include their dependencies in your POM dependencies section:
2.7.2. Arquillian Mode Options
You can choose between following Arquillian modes
-
Standalone
-
runs tests without container integration, only lifecycle of extensions is managed
-
allows to use Graphene independently of Arquillian containers and deployment management
-
-
Container
-
runs tests with container, managed lifecycle of container including deployment
-
you can still use Graphene without managing lifecycle - just do not provide @Deployment in your test case and include those in dependencies section of your POM.
-
| You need to use Arquillian integration specific for your test framework - following dependencies are for JUnit - for using TestNG, you need to replace "junit" keyword with "testng" |
Standalone Mode
<!-- Arquillian JUnit Standalone -->
<dependency>
    <groupId>org.jboss.arquillian.junit</groupId>
    <artifactId>arquillian-junit-standalone</artifactId>
    <scope>test</scope>
</dependency>
Container Mode
<!-- Arquillian JUnit Container -->
<dependency>
    <groupId>org.jboss.arquillian.junit</groupId>
    <artifactId>arquillian-junit-container</artifactId>
    <scope>test</scope>
</dependency>
Which Version To Use?
To find out which version to use, check out http://arquillian.org/modules/core-platform/
2.7.3. Container Management
Graphene uses Arquillian Containers in order to manage lifecycle of the application container and deployment.
To setup Arquillian to use your favorite container, refer to Container adapters.
2.7.4. Selenium Version
Graphene 2 covers integration with WebDriver (aka Selenium 2), but it can be used in the same project together with Graphene 1 (based on Selenium 1).
For more detailed summary of differences, refer to which Graphene to use?
When adding following dependencies, all required dependencies should be brought to your project as transitive dependencies, including:
-
Drone
-
WebDriver
Use Graphene:
<dependency>
    <groupId>org.jboss.arquillian.graphene</groupId>
    <artifactId>graphene-webdriver</artifactId>
    <type>pom</type>
    <scope>test</scope>
</dependency>
Which Version To Use?
To find out which version to use, check out http://arquillian.org/modules/graphene-extension/
| In order to rewrite dependencies transitively brought by Graphene (e.g. Drone), you can use BOMs (see bellow) |
2.7.5. Which Graphene To Use ?
Graphene 1 (GrapheneSelenium) is derived from Selenium 1 (DefaultSelenium) and its base API is type-safe version of Selenium 1.
Graphene 2 is built on top of Selenium WebDriver (WebDriver) and it adds more functionality over basic WebDriver API.
Summary
Name |
Class |
Features |
Selenium 1 |
DefaultSelenium |
- |
Graphene 1 |
GrapheneSelenium |
type-safe version of DefaultSelenium + extensions |
Selenium 2 |
WebDriver and DefaultSelenium |
- |
Graphene 2 |
WebDriver |
extensions for WebDriver |
FAQ
What are differences between Graphene 1 and Graphene 2?
The differences are same like between Selenium 1 and Selenium 2.
Do I need to migrate tests from Graphene 1 to Graphene 2?
No, you can use them side by side - Selenium 2 comes with both APIs bundled in one library (DefaultSelenium and WebDriver),
and Graphene 1 and Graphene 2 follows that pattern.
Drone will make sure it instantiates right version for you.
What version is recommended?
Graphene 2 is the one which we focus development on - it is planned to have all features of Graphene 1 migrated to Graphene 2.
In the future, Graphene 2 will likely get functions which aren’t available for Graphene1, e.g.:
page abstractions.
2.7.6. BOM and Dependency Management Usage
In order to manage or override dependency versions used in the project, it is recommended to use BOMs. By importing BOM to your Maven POM, you manage versions of dependencies, so you don’t need to define them explicitly.
In connection to Graphene, you may want to use these BOMs:
2.8. Using WebDriver
Graphene builds on top of Selenium WebDriver project and brings extensions which helps you write robust Java-based tests simply from your IDE.
Graphene is thus not a standalone project, but an extension over Arquillian and Selenium projects to make testing easier.
2.8.1. How to Learn WebDriver?
You can start with resources Introducing WebDriver and WebDriver’s Advanced Usage.
After getting yourself familiar with what WebDriver is, you can dive into
Graphene documentation.
If you don’t find resources on how to achieve something with Graphene,
let’s try to look on how to achieve that with WebDriver.
2.8.2. Why I Need Graphene?
Graphene helps you to bring your test project to the world of Arquillian as well as it brings you very useful addons.
However you can use as much Graphene as you want, since Graphene integrates with WebDriver non-pervasively.
2.8.3. Graphene Integration With WebDriver - Under the Hood
The integration starts with instantiation of the WebDriver instance leveraging Arquillian Drone extension.
Graphene then takes new instance of WebDriver’s browser session and store it in its context.
Then Graphene also wraps the WebDriver instance in order to intercept calls.
2.9. Using Drone
Graphene integrates with Arquillian Drone to simplify process of
instantiation of browser session.
So Drone takes care of WebDriver instance creation and configuration and
then it delegates this session to Graphene.
2.9.1. Configuration
Graphene shares the configuration with Drone WebDriver, so you can refer to Drone.
In general, configuration is driven by arquillian.xml and can be overriden by System properties.
2.9.2. Browser Instantiation
You can ask Drone to instantiate any specific implementation of WebDriver like FirefoxDriver, ChromeDriver or HtmlUnitDriver, e.g.:
@Drone
FirefoxDriver browser;
But it is recommended to use WebDriver interface and use arquillian.xml to choose appropriate browser instance:
@Drone
WebDriver browser;
<arquillian xmlns="http://jboss.com/arquillian" xmlns:xsi="http://www.w3.org/2001/XMLSchema-instance"
xsi:schemaLocation="http://jboss.org/schema/arquillian http://jboss.org/schema/arquillian/arquillian_1_0.xsd">
<extension qualifier="webdriver">
<property name="browser">firefox</property>
</extension>
</arquillian>For more configuration options, refer to Drone and browser driver implementations.
2.9.3. Drone Reusable Session
In order to speed up development, Drone comes with Reusable Remote WebDriver Session feature.
This feature ensures that Drone does not close the browser session at the end of each test, and stores the session handle in permanent storage.
Thus after running first test, browser session is still open and next tests can reuse it.
Speed Up Development
Since browser session does not have to be opened repeatedly, Drone saves this time and repeating a test leads into huge time savings.
This enables browser automated test development to as close as unit tests execution time as possible.
Improved Browser Debugging
Since session is not closed at the end of test, you can tweak anything in browser setup you want including setup of browser debuggers (Firebug, Chrome Dev Tools).
You can for example:
-
open debugger and watch network usage
-
insert breakpoints to scripts
-
watch browser console
| It is tempting to use this feature to also speed up test execution - this is not recommended, since then tests can influence each other. |
Using Selenium Server
This feature is available only when using remote WebDriver session. So you need to download appropriate version of Selenium Server and start the server:
java -jar selenium-server-standalone-2.35.0.jarNow Drone can connect to this server and share the session-id across several tests.
Turn on Reusable Browser Session session
You can turn on Reusable Browser Session by following entry:
<arquillian xmlns="http://jboss.com/arquillian" xmlns:xsi="http://www.w3.org/2001/XMLSchema-instance"
    xsi:schemaLocation="http://jboss.org/schema/arquillian http://jboss.org/schema/arquillian/arquillian_1_0.xsd">

    <extension qualifier="webdriver">
        <property name="remoteReusable">true</property>
        <property name="remoteAddress">http://localhost:4444/wd/hub/</property>
    </extension>

</arquillian>
2.10. Testing AJAX
When testing AJAX-enabled applications, you are facing big deal of asynchronous behavior:
2.10.1. Waiting for the Results of Actions
When calling any action, it takes time before browser’s request is processed on the server. Test must be written so that it counts with any time before it can proceed with execution. This does not include only server processing, but also complex client-side computations.
Solution: Waiting for Appropriate Conditions
When writing tests, you must be aware what changes are happening on a page as a result of user action and design a appropriate condition to wait for.
Graphene offers two solution to waiting for appropriate conditions:
Waiting Conditions
Graphene uses WebDriverWait object and defines most used waiting
conditions in Graphene Utility Class.
When defining waiting conditions, you might use exact or benevolent conditions:
-
benevolent conditions (e.g. wait for text to appear on the page) are more robust, but does not test exact page conditions
-
exact conditions (e.g. wait for given element to have text which is equal to) tests application behavior more closely, but they are more error-prone
You can read more about Waiting API.
Request Guards
More powerful mechanism than conditions - Request Guards - watches request object on the page and waits for the given browser communication (HTTP, AJAX) to happen.
| It is not sufficient to use any mechanism for pausing the test as the mechanism for waiting for conditions (e.g. Thread.sleep) as it leads to unstable tests and increases execution time. The golden rule is that each action must have appropriate reaction on the page, otherwise the UI is not designed well. |
2.10.2. Elements Not Present
Test must be aware that elements which tests depend on might not be present immediately, but might be shown after the asynchronous action is processed.
2.10.3. Stale DOM Elements
AJAX-based applications often update page content by replacing a
portion of the DOM with another one.
Even though the rendered output might be the same, the element references
might be different.
Solution: Staleness Aware Page Abstractions
Page abstractions created by Graphene are by default aware of stale element, so they try to re-initialize element reference when they find out the reference is stale.
3. Graphene Configuration
Graphene is configured using arquillian.xml or alternatively via system properties.
3.1. WebDriver Configuration
Graphene uses WebDriver directly and thus it can be
configured via webdriver extension configuration.
Refer to Selenium 2 configuration options in Drone guide.
3.2. Graphene Configuration
Graphene specific configurations can be setup via arquillian.xml as
well:
<extension qualifier="graphene">
   <property name="waitGuiInterval">3</property>
</extension>| Configuration Property | Description | Default Value |
|---|---|---|
|
timeout for Graphene.waitGui method - waits for a short time, typically waits for client-side operations |
1 sec |
|
timeout for waitAjax - waits for longer time, typically ajax request with no computational load |
2 sec |
|
timeout for waitModel - waits for a long time, typically database requests or other computationally hard operations |
5 sec |
|
timeout for request guard methods |
equals to |
|
default locating strategy when there is empty |
|
|
timeout for installing JavaScript to the page via page extension mechanism |
5 sec |
You can also configure Graphene via System Properties either from
command line or pom.xml:
-Darq.extension.graphene.waitAjaxInterval=3<build>
<plugins>
<plugin>
<artifactId>maven-surefire-plugin</artifactId>
<configuration>
<systemProperties>
<arq.extension.graphene.waitAjaxInterval>3</arq.extension.graphene.waitAjaxInterval>
</systemProperties>
</configuration>
</plugin>
</plugins>
</build>4. Graphene Utility Class
Graphene is an entry point for the common one-line operations:
4.1. Static Import of Graphene Utility Class
The main advantage of the Graphene utility class is, that it includes set of static methods, which can be used directly from your test:
Graphene.guardAjax(button).click();This concept is much stronger when using possibilities of your IDE for code completion.
| You can use Eclipse Favorites feature and include Graphene into list of utility classes - you will get suggestions for code-completion out of the box. |
4.1.1. Waitings
Shortcut for fluent waiting API.
waitAjax();
waitGui();
waitModel();

//e.g.
button.click();
waitGui().withMessage("Popup should be opened after clicking on that button!").until().element(popupPanel).is().visible();
See the Waiting API documentation page for more information.
4.1.2. Request Guards
It is a shortcut for the Graphene request guards, which are powerful tools to assert that an AJAX/HTTP or no request was done.
guardAjax(Object);
guardHttp(Object);
guardNoRequest(Object);
waitForHttp(Object);

//e.g.
guardAjax(button).click();
waitForHttp() is a guard as well, even when its name does not tell it.
The difference between the waitForHttp() and the guardHttp() is that
the first one ignores AJAX requests during its waiting period and
the second one does not.
See the Request Guards documentation page for more information.
4.1.3. Creating Page Fragments Dynamically
Sometimes you need a way to create a Page Fragment instance not by
injecting it via @FindBy, but dynamically.
createPageFragment(Class<T> clazz, WebElement root);Consider a Tab Panel widget, for which you want to create a Page Fragment. You do not know in advance how many tabs it will have and you want to return an initialized Page Fragment with tabs content each time user switches to a particular tab. This method is suitable for this.
4.1.4. Page Object Location Encapsulation
You can find more information about Page Object location encapsulation on this documentation page.
Basically, you can use Graphene.goTo() method like this:
@Location("register.html")
public class RegistrationPage {
  //all the Page Objects FindBy, etc. goes here
}

public class TestSuite {

  public void test() {
    Graphene.goTo(RegistrationPage.class);
    //testing of the page goes here;
  }

}
Graphene will load http://locahost:8080/register.html into your
default browser.
You can specify the browser into which the page should be loaded by
passing a browser qualifier as a
Graphene.goTo(Class<?> pageObject, Class<?> browserQualifier)
parameter.
|
5. Waiting API
WebDriver execution is always faster than changing the state of the page. This powerful API, should help you to synchronize with the tested page. See also Graphene Request Guards as the other method of synchronizing with the page.
The starting point for Wait API is Graphene Utility class and its methods:
waitModel(); //waiting for long client-server operations, e.g. database fetch
waitAjax(); //waiting for an Ajax update on the page
waitGui(); //waiting for a GUI client operation
They are just aliases on the same mechanism with different timeouts. Their purpose is to group 3 most common operation types, that require waiting for them to finish.
| The waitAjax does not require any XHR request to happen. It’s just about how long test should wait! |
Refer to Graphene Configuration page to see the configuration properties, in case you want to change default timeouts for those three waiting types.
5.1. Fluent API
One of the ways to go with waiting API, is to use its fluent version. The tree of the possible method calls is:
waitGui().until().element(webElementOrBy).is().
                                         .is().not().present();
                                                    .enabled();
                                                    .selected();
                                                    .visible();

//some attribute contains given value
waitGui().until().element(webElementOrBy).attribute("class").contains("foo-bar");

//you can explicitly set how often should Graphene poll the page for the result of the waiting condition
waitGui().pollingEvery(1, TimeUnit.SECONDS);

//you can set explicitly the timeout
waitGui().withTimeout(10, TimeUnit.SECONDS);

//you can set the message with which it would fail
waitGui().withMessage("The popup was not shown within the timeout!");

//or ignore some of the exceptions, which are thrown during waiting
waitGui().ignoring(StaleElementReferenceException.class);
Refer to Graphene javadoc for complete picture of all possible combinations.
| Use IDE autocomplete feature to work most efficiently with the fluent API. |
5.2. Using Predicate
Using the fluent builder is the preferred way to keep your tests
readable. Indeed there are cases where you need something more. Use
Predicate condition as a fallback:
waitGui().until(new Predicate<WebDriver>() {
       public boolean apply(WebDriver input) {
            //some complex finding out whether the condition is met
       }
});
5.3. Using Conditions Only
Sometimes you just need to assert that a condition is being met, you do
not need to wait for something. Following code will return a boolean
value:
new WebElementConditionFactory(webElement).isEnabled().apply(webDriverInstance);
new WebElementConditionFactory(webElement)).attribute("class").contains("foo-bar").apply(webDriverInstance);
6. Request Guards
Its purpose is to guard that the interaction of the user will/will not raise specific request to the server. It differs between following types:
-
No Request
-
AJAX Request
-
HTTP Request (regular HTTP)
6.1. Basic Usage
Request guards are available in Graphene Utility Class.
import org.openqa.selenium.WebElement;
import org.openqa.selenium.support.FindBy;
import org.junit.Test;
import org.jboss.arquillian.junit.Arquillian;
import org.junit.runner.RunWith;

import static org.jboss.arquillian.graphene.Graphene.guardHttp;
import static org.jboss.arquillian.graphene.Graphene.guardNoRequest;
import static org.jboss.arquillian.graphene.Graphene.guardAjax;


@RunWih(Arquillian.class)
public class TestClass {

    @FindBy(id="http")
    private WebElement buttonWhichMakesFullPageRefresh;

    @FindBy(id="none")
    private WebElement buttonWhichMakesNoRequest;

    @FindBy(id="ajax")
    private WebElement buttonWhichMakesAjaxRequest;

    @Test
    public void testSimple() {
        guardHttp(buttonWhichMakesFullPageRefresh).click();
        guardAjax(buttonWhichMakesAjaxRequest).click();
        guardNoRequest(buttonWhichMakesNoRequest).click();
    }
}
If the given request isn’t detected, the RequestGuardException is
thrown.
|
6.2. Use Cases
Guards are able to intercept the given object to verify, that request which occurs after a method invocation is expected.
|
The request needs to end within the waiting period. If the
request is finished before waiting period then guard stops waiting and
test execution proceeds. On the other hand when request has not been ended within the waiting period the exception is thrown. |
Let’s examine following scenarios. GuardA means guard on controlA,
GuardB means guard on controlB. XhrA is an ajax request triggered
by controlA, XhrB is an ajax request triggered by controlB.
Scenario 1
GuardA.start
XhrA.start
GuardA.end        <-RequestGuardException
XhrA.end
In this scenario XHR has started within waiting period but took long
time to finish (slow Internet connection or request execution on
server).
In this case RequestGuardException will be thrown.
Scenario 2
XhrB.start
GuardA.start
XhrB.end        <-Test proceeds, but test may fail if subsequent instructions depend on results of XhrA
GuardA.end
XhrA.start
XhrA.end
Here we have interference of some other request (i.e. page is polling
the server). We guard request that should be triggered by controlA but
during waiting period some other XHR request ends.
Currently guards do not have any way to tell which operation did the
request originated from, so the guard will stop waiting and text
execution will proceed.
If in the next step you want to i.e. click on button that would be rendered
by XhrA (that hasn’t yet finished) you would get
ElementNotFoundException.
Currently there is no way to protect against this scenario.
| Request start (thus end) may be delayed (i.e. by some javascript like a4j:queue) and the request may not end within wait period. To deal with that you should increase wait period. |
<input id="buttonA" type="button" onclick="setTimeout(function(){jQuery.ajax("/")},3000)"/>
---
guardAjax(buttonA).click();| XHR may be triggered on slightly different event then the one fired by command (i.e. sendKeys does not trigger onchange) |
<input id="inputA" type="text" onchange="jQuery.ajax("/")"/>
---
guardAjax(inputA).sendKeys("abc"); //Wrong, sendKeys triggers keyUp, keyDown, but not "change" event.
---
inputA.sendKeys("abc");   //Good
guardAjax(inputA).blur();
7. Page Abstractions
Page Abstractions enhance the way your tests are written. They make your tests more robust and therefore more reliable.
Page Abstractions included here are:
To see their power let’s start with a little bit of motivation. Do you often see Graphene (or Selenium Webdriver) tests like this:
public class TestAutocompleteWidgets extends AbstractGrapheneTest {

    private final By firstAutocompleteInput =
                               By.css("input[type=\"text\"]:nth-of-type(1)");
    private final By secondAutocompleteInput =
                               By.css("input[type=\"text\"]:nth-of-type(2)");
    private final By thirdAutocompleteInput =
                               By.css("input[type=\"text\"]:nth-of-type(3)");
    private final By suggestion =
                               By.className("rf-au-itm");

    @Test
    public void testFirstAutocomplete() {
        WebElement autocomplete = driver.findElement(firstAutocompleteInput);

        autocomplete.sendKeys("Ar");
        waitForSuggestions();

        List<WebElement> suggestions = driver.findElements(suggestion);

        assertEquals(suggestions.size(), 2,
                           "There should be two suggestions!");
        assertEquals(suggestions.get(0).getText(), "Arizona",
                           "The first suggestion is wrong!");
        assertEquals(suggestion.get(1).getText(), "Arkansas",
                           "The second suggestion is wrong!");
    }


    @Test
    public void testSecondAutocomplete() {
        //other similar interactions with the other two Autocomplete widgets
    }

    private waitForSuggestions() {
        //some wait method to wait for suggestions becoming visible
    }
}
In the previous example you can notice that tests are tightly coupled with the HTML structure of the tested page. So once the structure of the page changes (it can be even slight change in class attribute of some element) tests are affected as well. These small changes can effectively break a lot of tests, in other words increase the time spent on the tests maintenance.
7.1. There Comes Page Objects Pattern To Improve This.
Basically it is an encapsulation of the tested page structure into one class, which will contain all the page fragments (parts, components, widgets) together with all handy methods which you will find useful while testing the encapsulated page.
Very simple Page Object which results from the previous test example is below:
public class TestPage {

    @FindBy(css = "input[type=\"text\"]:nth-of-type(1)")
    private WebElement firstAutocompleteInput;

    @FindBy(css = "input[type=\"text\"]:nth-of-type(2)")
    private WebElement secondAutocompleteInput;

    @FindBy(css = "input[type=\"text\"]:nth-of-type(3)")
    private WebElement thirdAutocompleteInput;

    @FindBy(className = "rf-au-itm")
    private List<WebElement> suggestions;

    //getters for all fields of this Page Object

    private waitForSuggestions() {
        //some wait method to wait for suggestions becoming visible
    }

    //other handy methods used with testing of the page
}
The test can be now be decoupled from the underlying HTML structure of the tested page. Once the structure changes, the only modification will be needed in Page Object. The test would look like below snippet:
public class TestAutocompleteWidgets extends AbstractGrapheneTest {

    private TestingPage testingPage;

    @Before
    public void initializeTestingPage() {
        testingPage = PageFactory.initElements(driver, TestingPage.class);
    }

    @Test
    public void testFirstAutocomplete() {

        testingPage.getFirstAutocompleteInput().sendKeys("Ar");
        testingPage.waitForSuggestions();

        List<WebElement> suggestions = testingPage.getSuggestions();

        assertEquals(suggestions.size(), 2,
                    "There should be two suggestions!");
        assertEquals(suggestions.get(0).getText(), "Arizona",
                    "The first suggestion is wrong!");
        assertEquals(suggestion.get(1).getText(), "Arkansas",
                    "The second suggestion is wrong!");
    }


    @Test
    public void testSecondAutocomplete() {
        //other similar interactions with the other two Autocomplete widgets
    }
}
To read more about how Graphene helps with utilization of this concept, please follow Page Objects.
Page Objects pattern is a well known concept, which greatly improves tests robustness. However, is there more space for improvement ?
Consider the previous example, where we were testing three autocomplete widgets. Each of the test had to deal with the interaction between driver and that component on its own. Unfortunately not only tests in that one test class, but all the tests which interact with the same autocomplete widget get implemented with the same UI framework. It is a huge DRY violation.
7.2. Therefore Graphene introduces a new concept, called Page Fragments to improve this.
What are Page Fragments in short ?
-
Page Fragments stands for any part of the tested page, any widget, web component, etc.
-
A concept of encapsulation of these parts into completely reusable pieces across all your tests.
-
Powerful mechanism for creating own page fragments, like Autocomplete (Calendar, Login, etc.) page fragment.
-
A concept which differentiates each fragment by its root element and make other parts reference from it.
-
A solution which leverages Selenium WebDriver under the hood together with all Graphene killer features.
-
Set of utilities which simplify using of this feature in tests, together with better support for Page Objects pattern.
So we already know that autocomplete widget from the previous example can be encapsulated into one object. As it is part of the page, its fragment, let’s call that object Page Fragment. Better than words, let’s see an example of such encapsulation below.
public class AutocompleteFragment<T> {

    @Root
    WebElement root;

    @FindBy(css = "input[type='text']")
    WebElement inputToWrite;

    public static final String CLASS_NAME_SUGGESTION = "rf-au-itm";

    public List<Suggestion<T>> getAllSuggestions(SuggestionParser<T> parser) {
        List<Suggestion<T>> allSugg = new ArrayList<Suggestion<T>>();

        if (areSuggestionsAvailable()) {
            WebElement rightSuggList = getRightSuggestionList();

            List<WebElement> suggestions =
                 rightSuggList.findElements(
                    By.className(CLASS_NAME_SUGGESTION));

            for (WebElement suggestion : suggestions) {
                allSugg.add(parser.parse(suggestion));
            }
        }

        return allSugg;
    }

    public List<Suggestion<T>> type(String value, SuggestionParser<T> parser) {
        List<Suggestion<T>> suggestions = new ArrayList<Suggestion<T>>();

        inputToWrite.sendKeys(value);
        try {
            waitForSuggestions();
        } catch (TimeoutException ex) {
            // no suggestions available
            return suggestions;
        }

        suggestions = getAllSuggestions(parser);
        return suggestions;
    }

    //other handy encapsulation of Autocomplete services
}
It is nothing special. The only difference between Page Objects and Page
Fragments is the element annotated with the @Root annotation. All
other WebElement fields annotated with @FindBy are referenced from
that root element. It makes such implementation pretty generic and
reusable across all tests which need to interact with the encapsulated
Page Fragment.
The @Root annotation is optional, you typically use it when you need
to directly invoke methods on it in your fragment’s code. Therefore, you
do not need to declare such element. Graphene will take care of it. You
denote whether it is a Page Fragment or a Page Object in the way you use it
(a particular Page Object is annotated with @Page, a Page Fragment
with @FindBy annotation).
|
To introduce Page Fragments into previous test example, one need to do for example following:
-
Move autocomplete specific methods from
TestingPageto theAutocompleteFragment<T>implementation, so they can be reused in other tests for different applications or pages too. -
Declare Page Fragments into Page Object (
TestingPage, preferred option) or directly into the tests (this again couples tests with the structure of the testing page, less preferred). -
Rewrite Page Object methods so they will interact with the Page Fragments instead of plain WebElements.
Following snippet shows that:
public class TestPage {

    @FindBy(css = "div[class=\"rf-au\"]:nth-of-type(1)")
    private AutocompleteFragment<String> autocomplete1;

    @FindBy(css = "div[class=\"rf-au\"]:nth-of-type(2)")
    private AutocompleteFragment<String> autocomplete2;

    @FindBy(css = "div[class=\"rf-au\"]:nth-of-type(3)")
    private AutocompleteFragment<String> autocomplete3;

    // getters for all fields of this Page Object

    // other handy methods used with testing
    // of the page now using the methods called from Page Fragments
}
For more information about how Page Fragments are declared, initialized and more, please continue with Page Fragments.
7.3. Page Objects
Page Objects pattern is very well described here.
Graphene comes with support for this pattern. The main additions are:
-
Better support for initialization of the Page Objects. Graphene automatically enriches the Page Object’s injection points (e.g.
@FindBy). -
Page Objects can contain Page Fragments and they are also properly initialized.
-
Page Objects can contain any injection point which Arquillian supports.
-
e.g.
@Drone WebDriverfor injecting browser instance
-
-
Page Objects can encapsulate their location.
You have already seen the default way of initializing Page Objects in Page Abstractions.
Let’s showcase Graphene way of doing this!
-
Implement a Page Object.
-
Declare it in the test.
-
Annotate it with
org.jboss.arquillian.graphene.spi.annotations.Pageannotation. -
And that’s all! No need to initialize Page Object via any factory method.
To see it in action, consider the code snippets below, which demonstrate testing of a simple web page with progress bar and two buttons.
7.3.1. Implement Page Object
import org.openqa.selenium.support.FindBy;

public class TestPage {

    @Drone
    private WebDriver browser;

    @FindBy(className = "start-button")
    private WebElement startButton;

    @FindBy(className = "stop-button")
    private WebElement stopButton;

    @FindBy(id = "progress")
    private WebElement progressBar;

    @FindBy(className = "foo-bar")
    private List<WebElement> listOfElements;

    //getters for all fields of this Page Object

    public long start() {
        startButton.click();

        return System.currentTimeMillis();
    }

    public void stop() {
        stopButton.click();
    }

    /**
    * Returns the progress, that is, on how many percents it is completed.
    */
    public int getProgress() {
        //parse string which contains % sign to an int value
        //you may use also injected browser instance
    }

    public long waitUntilCompleted() {
        while(getProgress() != 100) {
            //do nothing
        }

        return System.currentTimeMillis();
    }

    //other handy methods used with testing of the page
}| Page Objects can be declared also as nested classes. However, to better decouple test logic from the structure of the tested page, it is recommended to declare Page Objects as standalone classes. |
Your are not limited just with injecting WebElement instances. You can
in the same way inject your Page Fragments, or even
java.util.List of Page Fragments/WebElements.
|
You have to use private fields for all Graphene initialized
WebElement/Page Fragments etc. Use their getters from tests.
|
|
Page Objects in Multiple Browsers Scenario
If you use page abstractions together with parallel browsers feature, be sure to check Using Page Abstractions with Multiple Browsers. |
7.3.2. Declare It In The Test And Annotate It With @Page Annotation.
import org.jboss.arquillian.graphene.page.Page;
//other imports

@RunWith(Arquillian.class)
public class TestClass {

    //ommitting all the other Arquillian related methods for deployment etc.

    @Page
    private TestingPage testingPage;

    @Test
    public void test1() {
        long startedAt = testingPage.start();

        long endedAt = testingPage.waitUntilCompleted();

        long lastInSeconds = (endedAt - startedAt) / 1000

        assertTrue(lastInSeconds < 20, "It took: " + lastInSeconds + ", its too much!");
    }

    @Test
    public void test2() {
        //other test which can also call methods from already initialized {{TestingPage}}
    }
}
7.3.3. Deployment and Browser Determination
The deployment according to which the @Location value will be
resolved, and the browser into which the page will be loaded can be
determined in the following way:
import org.jboss.arquillian.container.test.api.Deployment;
import org.jboss.arquillian.container.test.api.OperateOnDeployment;
import org.jboss.arquillian.container.test.api.RunAsClient;
import org.jboss.arquillian.graphene.page.InitialPage;
import org.jboss.arquillian.graphene.page.Location;
//other imports

@RunWith(Arquillian.class)
@RunAsClient
public class TestLocation {

    @Drone
    private WebDriver browser;

    @Drone
    @Browser2
    private WebDriver browser2;

    @Deployment
    public static WebArchive createTestArchive() {
        //returning default war
    }

    @Deployment(name = "deployment1")
    public static WebArchive createTestArchive1() {
       //returning some different war
    }

    @Test
    @OperateOnDeployment("deployment1")
    public void test1(@InitialPage MyPageObject1 obj) {
        //testing the page with help of MyPageObject1
    }

    @Test
    public void test2(@Browser2 @InitialPage MyPageObject2 obj) {
        //Graphene will load as the first action MyPageObject2 location value to the browser2
        //testing the page with help of MyPageObject2
    }
}
You can read more about multiple deployments Arquillian feature here.
Graphene support for parallel browsers for more information about this subject.
7.4. Page Fragments
The concept of Page Fragments and motivation behind them were already introduced in Page Abstractions. Here you can find more detailed info about:
7.4.1. Relation to Page Objects
Page Fragments and Page Objects are similar concepts. They both decouple HTML structure of the tested application from the tests. They both encapsulate some kind of page services or the interactions a user can do with the page.
The difference is that Page Objects are encapsulating a specific page (or its part) of specific application, while Page Fragments are dealing with parts of the page, its widgets, components, basically fragments which are reusable across the whole web UI framework in which the application under test is written.
7.4.2. Usage
To use Page Fragment in your tests only thing you need to do is use an
implementation class of the Page Fragment together with @FindBy
annotation pointing to the root of the fragment.
@FindBy(css="cssLocatorOfThePageFragmentRoot")
private PageFragmentImplementation pageFragment;
Use @FindBy annotation as you are used to with plain WebElement, so
indeed you can use other locating strategies (xpath, id, className, …)
to reference the root of the Page fragment. The root of the fragment is
DOM element which is parent for all other elements which are part of the
Page fragment and need to be referenced from it (e.g. Calendar and its
cells).
These Page fragments and other WebElement fields are dynamically
initialized by Graphene so no need to initialize them via factories.
|
Handy Hints
|
There is another way to create Page Fragments. You can create them
dynamically with use of
Graphene.createPageFragment(Class<T> clazz, WebElement root). This may
be particularly useful when implementing Page Fragment for e.g. Tab
Panel widget.
7.4.3. Creating Page Fragments
To define own Page Fragment one needs to:
-
Recognize a fragment of the page which can be abstracted and encapsulated into a Page Fragment (Basically web UI components which are rendered always with the same DOM structure.)
-
Create a class or if you find it appropriate also an interface for it.
-
Define the parts you need for implementing the fragment’s services, which will be referenced from the injected root. Annotate them with
@FindByannotation. -
Define the methods which are basically encapsulation of the fragment services (Calendar services - get date, set date, …).
If you need to access the injected root of your Page Fragment, you can do
so by declaring a WebElement field with a @Root annotation.
|
|
There are two packages from where you can import
|
So the implementation can look like snippet below.
import org.jboss.arquillian.graphene.spi.annotations.Root;
import org.openqa.selenium.WebElement;
import org.openqa.selenium.support.FindBy;

public class PageFragmentExample {

    @Root
    private WebElement optionalRoot;

    @Drone
    private WebDriver browser;

    @FindBy(css="relativeLocatorOfThisPageFragmentPart")
    private WebElement otherPageFragmentPart;

    @FindBy(xpath="relativeLocatorOfThisPageFragmentPart")
    private WebElement alsoPageFragmentPart;

    public void firstServiceEncapsulated() {
        otherPageFragmentPart.click();
    }

    public void secondServciceEncapsulated() {
        alsoPageFragmentPart.clear();
    }

    public void thirdServiceWhichNeedsDirectAccessToRoot() {
        root.click();
    }

    public void fourthServiceWhichNeedsBrowserInstance() {
        Actions builder = new Actions(browser);

        builder.keyDown(Keys.CONTROL)
               .click(otherPageFragmentPart)
               .keyUp(Keys.CONTROL);
        builder.build().perform();
    }

    //other services and help methods
}| Be Careful with the xpath locators. They can be written in a way that it does not matter from which element they are referenced. Prefer therefore locating according to id, css or class name. |
Indeed you will need a reference for WebDriver instance. You can
easily inject it with @Drone annotation.
|
| You have to use private fields for all Graphene initialized WebElement/Page Fragments etc. Use their getters from tests. |
|
Page Fragments In Multiple Browsers Scenario
If you use page abstractions together with parallel browsers feature, be sure to Using Page Abstractions with Multiple Browsers. |
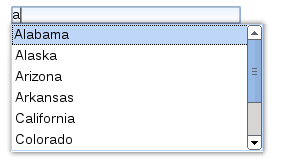
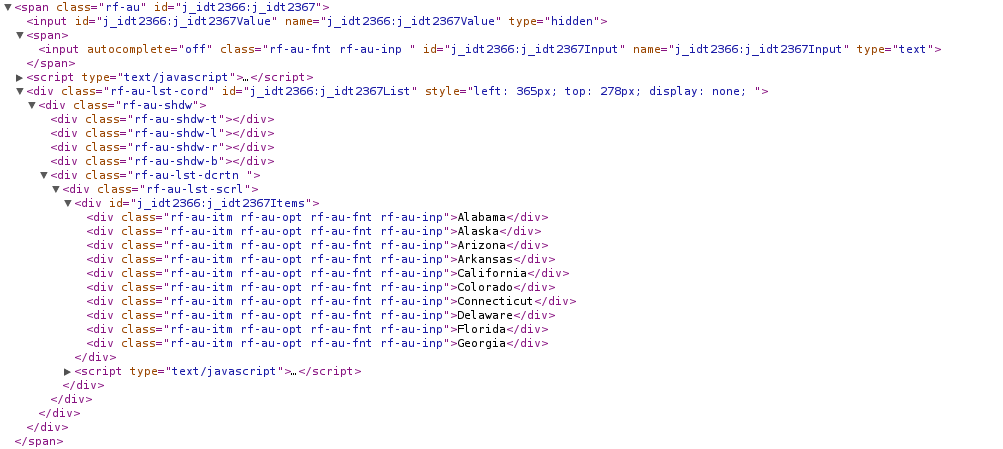
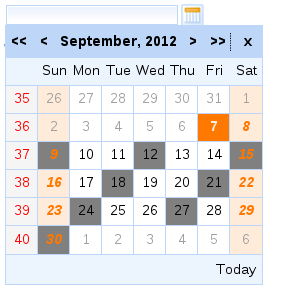
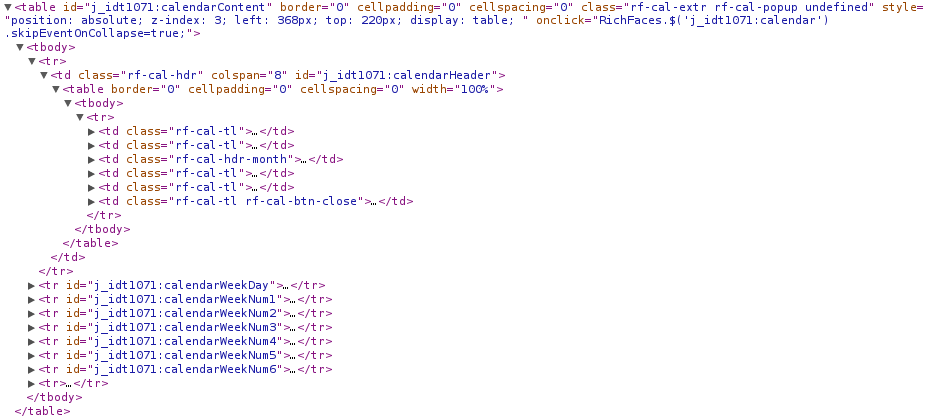
7.4.4. Samples of Page Fragments
Let’s consider following code snippets, which are reflecting some examples of the Page Fragments to start with. In each example you can find:
-
An image of the page fragment to be clear what we are speaking about.
-
HTML structure of the page fragment rendered in RichFaces framework.
-
Example of the Page Fragment encapsulation, either the implementation or just the interface for it.
Autocomplete
public class AutocompletePageFragment<T> {

    @Root
    WebElement root;

    @FindBy(css = CSS_INPUT)
    WebElement inputToWrite;

    public static final String CLASS_NAME_SUGGESTION_LIST = "rf-au-lst-cord";
    public static final String CLASS_NAME_SUGGESTION = "rf-au-itm";
    public static final String CSS_INPUT = "input[type='text']";

    private String separator = " ";

    public boolean areSuggestionsAvailable() {

        List<WebElement> suggestionLists = root.findElements(
              By.xpath("//*[contains(@class,'" + CLASS_NAME_SUGGESTION_LIST + "')]"));

        WebElement suggList = getRightSuggestionList();

        return suggList.isDisplayed();
    }

    public void finish() {
        inputToWrite.sendKeys(" ");
        inputToWrite.sendKeys("\b\b");
        root.click();
    }

    public List<Suggestion<T>> getAllSuggestions(SuggestionParser<T> parser) {
        List<Suggestion<T>> allSugg = new ArrayList<Suggestion<T>>();

        if (areSuggestionsAvailable()) {
            WebElement rightSuggList = getRightSuggestionList();
            List<WebElement> suggestions = rightSuggList.findElements(
                                         By.className(CLASS_NAME_SUGGESTION));

            for (WebElement suggestion : suggestions) {
                allSugg.add(parser.parse(suggestion));
            }
        }

        return allSugg;
    }

    public void setSeparator(String regex) {
        this.separator = regex;
    }

    public void type(String value) {
        inputToWrite.sendKeys(value);
        try {
            waitForSuggestions(GUI_WAIT);
        } catch (TimeoutException ex) {
            // no suggestions available

        }
    }

    public List<Suggestion<T>> type(String value, SuggestionParser<T> parser) {
        List<Suggestion<T>> suggestions = new ArrayList<Suggestion<T>>();

        inputToWrite.sendKeys(value);
        try {
            waitForSuggestions(GUI_WAIT);
        } catch (TimeoutException ex) {
            // no suggestions available
            return suggestions;
        }

        suggestions = getAllSuggestions(parser);
        return suggestions;
    }

    private void waitForSuggestions(int timeout) {
        (new WebDriverWait(GrapheneContext.getProxy(), timeout))
           .until(new ExpectedCondition<Boolean>() {

            public Boolean apply(WebDriver d) {
                return areSuggestionsAvailable();
            }
        });
    }

    //other Autocomplete services and help methods
}
Calendar
public class CalendarPageFragmentImpl {

    @Root
    private WebElement root;

    @FindBy(className = "rf-cal-inp")
    private WebElement input;

    @FindBy(css = "td[class=\"rf-cal-hdr-month\"] > div")
    private WebElement showYearAndMonthEditorButton;

    @FindBy(css = "img:nth-of-type(1)")
    private WebElement showCalendarButton;

    @FindBy(className = "rf-cal-day-lbl")
    private WebElement popupWithCalendar;

    @FindBy(css = "div[class=\"rf-cal-time-btn\"]:nth-of-type(1)")
    private WebElement okButton;

    @FindBy(css = "table[class=\"rf-cal-monthpicker-cnt\"] td:nth-of-type(4) > div")
    private WebElement nextDecade;

    @FindBy(css = "table[class=\"rf-cal-monthpicker-cnt\"] td:nth-of-type(3) > div")
    private WebElement previousDecade;

    private final String YEAR_AND_MONTH_LOCATOR_CSS =
                                                       "div[class=\"rf-cal-edtr-btn\"]";

    private final String DAY_LOCATOR_CLASS = "rf-cal-c";

    /**
     * The format of date displayed on the calendar input, default dd/M/yyhh:mma
     */
    private String dateFormat = "dd/M/yy hh:mm a";

    public void showCalendar() {

        if (!popupWithCalendar.isDisplayed()) {
            showCalendarButton.click();

            waitUntilPopupWithCalendarIsDisplayed();
        }
    }

    private void gotoDate(Date date) {
        showCalendar();

        Calendar cal = new GregorianCalendar();
        cal.setTime(date);
        int wishedYear = cal.get(Calendar.YEAR);
        // month is indexed from 0!
        int wishedMonth = cal.get(Calendar.MONTH);
        int wishedDay = cal.get(Calendar.DAY_OF_MONTH);

        cal.setTime(new Date(System.currentTimeMillis()));

        int todayYear = cal.get(Calendar.YEAR);
        int todayMonth = cal.get(Calendar.MONTH);
        // int todayDay = cal.get(Calendar.DAY_OF_MONTH);

        showYearAndMonthEditorButton.click();

        if ((wishedYear != todayYear) || (wishedMonth != todayMonth)) {
            List<WebElement> years;
            String txt;

            if (todayYear > wishedYear) {
                int howManyDecadesLessOrMore =
                                              (todayYear - wishedYear) / 10;

                for (int i = 0; i < howManyDecadesLessOrMore; i++)
                    previousDecade.click();
            }

            if (todayYear < wishedYear) {
                int howManyDecadesLessOrMore =
                                              (wishedYear - todayYear) / 10;

                for (int i = 0; i < howManyDecadesLessOrMore; i++)
                    nextDecade.click();
            }

            selectYear(wishedYear);

            years = root.findElements(By
                    .cssSelector(YEAR_AND_MONTH_LOCATOR_CSS));

            for (WebElement i : years) {
                txt = i.getText().trim();

                if (txt.matches("[a-zA-Z]+?")) {
                    if (txt.equals("Jan") && wishedMonth == 0) {
                        i.click();
                        // break;
                    } else if(txt.equals("Feb") && wishedMonth == 1) {
                        i.click();
                        // break;
                    } else if (txt.equals("Mar") && wishedMonth == 2){
                        i.click();
                        // break;
                    } else if (txt.equals("Apr") && wishedMonth == 3){
                        i.click();
                        // break;
                    } else if (txt.equals("May") && wishedMonth == 4){
                        i.click();
                        // break;
                    } else if (txt.equals("Jun") && wishedMonth == 5){
                        i.click();
                        // break;
                    } else if (txt.equals("Jul") && wishedMonth == 6){
                        i.click();
                        // break;
                    } else if (txt.equals("Aug") && wishedMonth == 7){
                        i.click();
                        // break;
                    } else if (txt.equals("Sep") && wishedMonth == 8){
                        i.click();
                        // break;
                    } else if (txt.equals("Oct") && wishedMonth == 9){
                        i.click();
                        // break;
                    } else if (txt.equals("Nov") && wishedMonth == 10{
                        i.click();
                        // break;
                    } else if (txt.equals("Dec") && wishedMonth == 11{
                        i.click();
                        // break;
                    }
                }
            }

            okButton.click();
        }

        List<WebElement> days = root.findElements(By
                .className(DAY_LOCATOR_CLASS));
        String txt;
        for (WebElement i : days) {
            txt = i.getText().trim();
            int day = new Integer(txt);
            if (day == wishedDay) {
                i.click();
                break;
            }
        }
    }

    /**
     * Selects the year on the calendar, note that the month and year editor has
     * to be shown already
     *
     * @param wishedYear
     *            the year you want to set
     * @return true if the year was successfully set, false otherwise
     */
    private boolean selectYear(int wishedYear) {
        List<WebElement> years = root.findElements(By
                .cssSelector(YEAR_AND_MONTH_LOCATOR_CSS));
        String txt;

        for (WebElement i : years) {

            txt = i.getText().trim();
            int year;

            if (txt.matches("\\d+?")) {
                year = new Integer(txt);

                if (wishedYear == year) {
                    i.click();
                    return true;
                }
            }
        }
        return false;
    }

    public void gotoDateTime(DateTime dateTime) {
        Date date = dateTime.toDate();
        gotoDate(date);
    }

    public void gotoDateTime(DateTime dateTime, ScrollingType type) {
        throw new UnsupportedOperationException("Not implemented yet!");
    }

    public CalendarDay gotoNextDay() {
        Date date = getDateTime().toDate();
        Calendar cal = new GregorianCalendar();
        cal.setTime(date);
        cal.roll(Calendar.DAY_OF_MONTH, true);

        gotoDate(cal.getTime());

        // CalendarDay day = new CalendarDayImpl();
        return null;
    }
}
Table
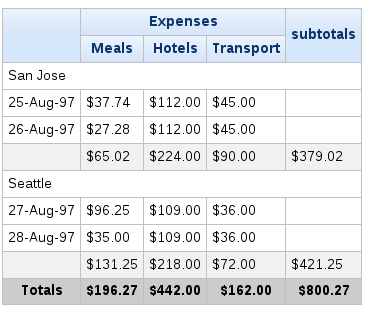
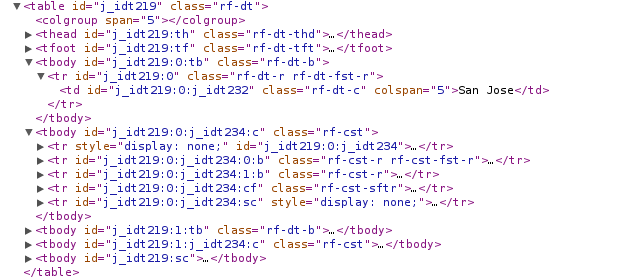
public interface TableComponent {

    /**
     * Associates this data table with a given data scroller
     *
     * @param scroller the scroller to associate this table with
     */
    void setDateScroller(DataScrollerComponent scroller);

    /**
     * <p>
     * Returns the total number of rows in this particular table.
     * </p>
     * <p>
     * The <code>rowspan</code> html atribute is not considered,
     * in other words the row with <code>rowspan</code> equals 2 is
     * considered as one row.
     * </p>
     *
     * @return
     */
    int getNumberOfRows();

    /**
     * <p>
     * Returns total number of cells in this particular table.
     * </p>
     *
     * @return
     */
    int getNumberOfCells();

    <T> List<Cell<T>> findCells(CellFunction<T> function);

    List<Row> findRow(RowFunction function);

    <T> List<Column<T>> findColumns(ColumnFunction<T> function);

    /**
     * <p>
     * Returns the total number of columns in this particular table.
     * </p>
     * <p>
     * The <code>colspan</code> html atribute is not considered,
     * in other words the column with <code>colspan</code> equals 2 is
     * considered as one column.
     * </p>
     *
     * @return
     */
    int getNumberOfColumns();

    /**
     * Returns the particular cell, the cell with coordinations determined
     * by given row and column.
     *
     * @param row
     * @param column
     * @return
     */
    <T> Cell<T> getCell(Row row, Column<T> column);

    /**
     * Returns the list of all header cells, in other words the whole table header.
     *
     * @return
     */
    Header getTableHeader();

    /**
     * Returns the list of all footer cells, in other words the whole table footer.
     *
     * @return
     */
    Footer getTableFooter();

    /**
     *
     * @return
     */
    List<Row> getAllRows();

    /**
     * Returns the first row of the table, the header row if available, is not counted.
     *
     * @return
     */
    Row getFirstRow();

    /**
     * Returns the last row of the table, the footer row if available, is not counted.
     *
     * @return
     */
    Row getLastRow();

    /**
     * <p>
     * Returns the row with the order determined by given param <code>order</code>.
     * </p>
     * <p>
     * Rows are indexed from 0. The header row if available is not counted.
     * </p>
     *
     * @param order the order of the row
     * @return the particular row, or null if it does not exist
     */
    Row getRow(int order);
}
Login Component
public class LoginPageFragment {

    @Root
    private WebElement root;

    @FindBy(css="input[type='text']")
    private WebElement loginInput;

    @FindBy(css="input[type='password']")
    private WebElement passwordInput;

    @FindBy(css="input[type='submit']")
    private WebElement loginButton;

    @FindBy(className="errorMsg")
    private WebElement errorMsg;

    public void fillInLogin(String login) {
        loginInput.sendKeys(login);
    }

    public void fillInPassword(String password) {
        passwordInput.sendKeys(password);
    }

    public void login() {
        loginButton.click();
    }

    public String getErrorMsg() {
        return errorMsg.getText();
    }
}
7.5. Location of Pages
7.5.1. Location concepts
Page object encapsulates some page. This page has its location. We can see the location of a page as some kind of metadata logically related to that page. In order to have this location information wired with page as such, there is @Location annotation by which you can specify where some page is located. Check out this simple example:
@Location("index.html")
public class SomePage
{
  // just some page object
}
The above location value will be treated as the relative URL to the value of @ArquillianResource URL contextRoot - e.g. http://localhost:8080/app/index.html.
| Use @Location("") to denote that page object’s location equals to the context root of the deployed application. |
By putting @Location annotation at page object, when you inject this page annotated with @InitialPage annotation into a test method, that page object will be open at that location as the very first action in a test method. Lets see an example:
@Test
public void testMethod(@InitialPage SomePage page)
{
    // here you will have your page already open, WebDriver opens index.html

    // other code
}
7.5.2. Location schemes
Every location has some scheme. In the previous example, HTTP scheme is used by default. There are multiple schemes as:
HTTP Scheme
Treats location as http:// scheme. You do not have to specify scheme parameter since by default it is HTTP
@Location("http://www.google.com") // by default scheme = Scheme.HTTP.class when omitted
@Location("https://www.google.com") // works with https as well, scheme is same|
You can not do this since it is not possible to say if this location is relative (as index.html) or absolute. You have to use http:// scheme string explicitly to open regular "www" page on the net. |
File Scheme
Treats location as file:// scheme
@Location(scheme = Scheme.FILE.class, value = "file:///full/path/to/page.html")Resource Scheme
Treats location as resource:// scheme
@Location(scheme = Scheme.RESOURCE.class, value = "resource://...")| The "resource://" prefix denotes that the page is not deployed to any container, and will be loaded from local file-system. The same you can achieve with prefix "file". |
| Check out Graphene Utility Class documentation page, to see how you can use Graphene.goTo(Class<?> pageObjectClass) method to load Page Object location in the browser. |
7.5.3. How Do I Implement My Own Scheme?
Custom scheme is implemented e.g. in Droidium so you can open your activities as pages. You have to extend org.jboss.arquillian.graphene.spi.location.Scheme and add your own scheme like this:
public DroidiumScheme extends Scheme
{

    private static final String scheme = "and-activity://";

    @Override
    public String toString()
    {
        return scheme;
    }
}
Then you have to implement your own org.jboss.arquillian.graphene.location.decider.LocationDecider which is in Graphene SPI as well. This decider resolves scheme value to which WebDriver instance will subsequently open via get() method.
Finally you have to register this decider as a service in Arquillian’s loadable extension.
After that, you can do this:
@Location(scheme = DroidiumScheme.class, value = "this.is.my.android.activity")
public class SomeActivityPage
{
}
@Test
public void testMyActivity(@InitialPage SomeActivityPage myActivity)
{
// here your Android activity will be already open by WebDriver
}7.5.4. How To Set Default Scheme Per Project?
Imagining you are dealing only with Android activities so specifying scheme = DroidiumScheme.class is not needed. You can set default scheme in arquillian.xml like this:
<extension qualifier="graphene">
  <!-- Droidium everywhere -->
  <property name="scheme">org.arquillian.droidium.native_.spi.location.DroidiumScheme</property>
</extension>
Now you can use it like:
@Location("this.is.my.android.activity")8. Location Strategies
It is a way to wire-up your tests with the elements from the tested page.
Graphene indeed supports a @FindBy mechanism, well-known from
WebDriver
project. That means support for e.g. css, id, tagName and other
default location strategies. Graphene adds some goodies to this
mechanism, check out FindBy annotation for more
info.
@FindBy(id = "htmlIdOfTheElement")
private WebElement yourElement;
However, it lacks support for custom location strategies. Graphene comes
with ability to extend it, and at the same time provides an actual
extension: @FindByJQuery annotation, which brings
JQuery selectors to your tests.
8.1. Extending The Location Strategy
To introduce our own strategy, lets say for angular.js, one needs to simply:
8.1.1. Extend By Class
Be inspired with ByJQuery class.
8.1.2. Implement LocationStrategy Interface
An implementation can look like following snippet:
public static class AngularLocationStrategy implements LocationStrategy {

        @Override
        public ByAngular fromAnnotation(Annotation annotation) {
            FindByAngular findBy = (FindByAngular) annotation;
            return new ByAngular(findBy.value());
        }
}8.2. Delegate to WebElement
It is easy to add all WebElement methods to your custom page fragment,
because Graphene supports delegate pattern.
8.2.1. Basic Usage
Suppose following page fragment, which implements WebElement.
import org.jboss.arquillian.graphene.fragment.Root;
import org.openqa.selenium.WebElement;

public abstract class MyInputFragment implements WebElement {

    @Root
    private WebElement input;

    public String getInputText() {
        return input.getAttribute("value");
    }

    public String getStyleClass() {
        return input.getAttribute("class");
    }
}
Graphene will ensure that you can call on such a page fragment all
WebElement and all your custom methods.
import org.openqa.selenium.support.FindBy;
import org.openqa.selenium.WebDriver;
import org.junit.Test;
import org.junit.runner.RunWith;
import org.jboss.arquillian.junit.Arquillian;
import org.jboss.arquillian.container.test.api.RunAsClient;
import org.jboss.arquillian.drone.api.annotation.Drone;

@RunWith(Arquillian.class)
@RunAsClient
public class Test {

    @Drone
    private WebDriver browser;

    @FindBy(css = ".foo-bar")
    private MyInputFragment input;

    @Test
    public void testPageFragmentMethodIsDelegatingCorrectly() {
        //page loading, etc.

        //WebDriver methods
        input.sendKeys("Graphene rulez!");

        //Custom fragment methods
        String value = input.getInputText();
    }
}
8.3. FindBy annotation
Graphene comes with support for Selenium 2, @FindBy
annotation,
which can be used to locate your elements in your
Page Objects, Page
Fragments and in tests as well.
8.3.1. Basic Usage
import org.openqa.selenium.support.FindBy;

public class TestClassOrPageObjectOrPageFragment {

  @FindBy(id = "myButton")
  private WebElement button;

  @FindBy(className = "foo-bar")
  private MyPageFragmentImpl myFragment;

  @FindBy(css = ".blah-class")
  private List<WebElement> myListOfWebElements;

  @FindBy(css = ".foo-bar")
  private List<MyPageFragmentImpl> myListOfPageFragments;

  @FindBy(id = "select")
  private Select select;
}
As you can see, the @FindBy annotation usage is pretty the same as
with the Selenium 2.
Graphene allows you to annotate these fields:
-
WebElement, -
Page Fragment,
-
list of
WebElements, -
list of Page Fragments,
-
and also any
WebElementwrappers, such asorg.openqa.selenium.support.ui.Select
| No need to initialize those fields with any Page Factory. Graphene will do so for you automatically. |
Graphene supports also the @FindBy’s annotation and the How usage.
|
8.3.2. Default Locating Strategy For Locating Elements With Empty @FindBy
You can often find this pattern in your tests when locating elements
with use of @FindBy:
@FindBy(id = "loginButton")
WebElement loginButton;
When using @FindBy annotation with Graphene, the following is equal to
the above:
@FindBy
WebElement loginButton;
Graphene by default automatically infers the element by using
ByIdOrName location strategy and the field name as the locator.
It can be configured with the defaultElementLocatingStrategy property
in arquillian.xml. The possible values are the lowercase values of
How
enum.
8.4. JQuery Locating Strategy
You can leverage JQuery Selectors API to locate your elements.
import org.jboss.arquillian.graphene.findby.FindByJQuery;

@FindByJQuery(".foo-class:eq(0)")
private WebElement customElement;
The above code will locate the the first element with the class 'foo-class'.
| This locating strategy requires JQuery to be installed to the page. Graphene installs it in a no conflict way automatically if it is needed (jquery locating strategy is used and it has not been installed yet). Note that it can have small performance impact, because the installation of the JQuery library can take some time. Therefore, locating by id, css, or className is preferred if possible or when you care about that 1 sec which it takes usually. |
8.4.1. Inferring The Element From The Root Of The Document
Sometimes it is handy to locate your elements which are inferred from
the root of the document. It can be especially used in Page Fragments,
where all defined @FindBy and the @FindByJQuery annotations are
inferred from the root of that Page Fragment.
To infer them from the root of the document just start their locators with html, head, or body expression. For example:
@FindByJQuery("body div:visible")
private WebElement firstVisibleDiv;
8.5. GrapheneElement
To extend WebElement interface with some methods, Graphene comes with
its GrapheneElement implementation.
It supports all WebElement methods, and currently adds only support
for boolean isPresent() method.
GrapheneElement can be used in the same places as WebElement.
@FindBy(tagName = "input")
private GrapheneElement button;
8.6. InFrame Annotation
To facilitate the tedious process of switching to and from a particular frame/iframe you can now just use the @InFrame annotation to specify in which frame the element should be located. The details are handled by Graphene.
8.6.1. Usage
@Page
@InFrame(index = 0)
private PageObject page;

@FindBy(id = "foo-bar")
@InFrame(nameOrId = "second")
private PageFragment myFragment;

@FindBy(tagName = "div")
@InFrame(index = 1)
private WebElement plainWebElement;
You can determine the iframe/frame by its index (zero based), or by
nameOrId strategy. Graphene will automatically switch to a particular
iframe/frame when a method is invoked on such annotated field.
When using @InFrame together with Page Object, all elements declared
in such Page Object will be treated as they are annotated with the same
@InFrame.
9. Dependency Injection
Following objects can be injected using @ArquillianResource annotation to:
-
test case
-
(a test class containing @Test method when it is marked to @RunWith(Arquillian.class))
-
-
Page Objects
-
Page Fragments
For example:
@RunWith(Arquillian.class)
@RunAsClient
public class MyTest {

    @Drone
    private WebDriver browser;


    @ArquillianResource
    private JavascriptExecutor executor;


    @Test
    public void test() {
       browser.navigate().to(...);
       executor.executeAsync(...);
    }
}
Here is a list of available resources that can be injected:
| Class | Purpose |
|---|---|
The main interface to use for testing, which represents an idealised web browser. |
|
Represents the local storage for the site currently opened in the browser. Each site has its own separate storage area. |
|
Represents the session storage in the browser for the site currently opened in the browser. The session storage areas is specific to the current top level browsing context. Each context has a unique set of session storage, one for each origin. Sites can add data to the session storage and it will be accessible to any page from the same site opened in that window. |
|
Represents the application cache status. |
|
Represents basic touch screen operations. |
|
Represents rotation of the browser view for orientation-sensitive devices. When using this with a real device, the device should not be moved so that the built-in sensors do not interfere. |
|
Represents the physical location of the browser. |
|
The user-facing API for emulating complex user gestures. Use this class rather than using the Keyboard or Mouse directly. Implements the builder pattern: Builds a CompositeAction containing all actions specified by the method calls. |
|
Represents basic keyboard operations. |
|
Represents basic mouse operations. |
|
Executes JavaScript, providing access to the mechanism to do so. |
|
Captures a screenshot and store it in different ways. |
|
Describes a series of key/value pairs that encapsulate aspects of a browser. |
10. Parallel Browsers
It is a way to use multiple WebDriver instances in one test.
10.1. Usage
Consider testing of the server push functionality. More particularly a scenario where:
-
You make an update to a server from a FireFox browser.
-
The server will push the update to all registered listeners.
-
You want to check that client loaded in the Chrome will receive the update as well.
The Graphene support for testing of the above will look like:
@Browser1
@Drone
private WebDriver browser1;

@Browser2
@Drone
private WebDriver browser2;

public void testServerPushFromFirefoxToChromeAfterRegistration() {
    browser1.get(“http://localhost:8080/myApp”);
    browser2.get(“http://localhost:8080/myApp”);

    formFragment.registerUser(new User(“John”), browser1);
    registeredUsers.assertContains(“John”, browser2);
}
@Browser1 and @Browser2 annotations are qualifiers, similar concept
as in CDI. Declaration of one of them may look like:
import java.lang.annotation.ElementType;
import java.lang.annotation.Retention;
import java.lang.annotation.RetentionPolicy;
import java.lang.annotation.Target;
import org.jboss.arquillian.drone.api.annotation.Qualifier;

@Retention(RetentionPolicy.RUNTIME)
@Target({ ElementType.FIELD, ElementType.PARAMETER })
@Qualifier
public @interface Browser1 {

}
You can configure these browsers in arquillian.xml:
<extension qualifier="webdriver-browser1">
  <property name="browser">firefox</property>
</extension>
<extension qualifier="webdriver-browser2">
  <property name="browser">chrome</property>
</extension>
10.2. Using Page Abstractions With Multiple Browsers
When you have multiple browser instances, lets say annotated with qualifiers @Browser1 and @Browser2, and want to inject a page abstraction, you have to specify against which browser instance you want to get it resolved:
@Browser1 @Drone WebDriver browser1;
@Browser2 @Drone WebDriver browser2;

@Browser1 @FindBy(id = "login-box") private LoginFragment loginFragment;
@Browser2 HomePage page;
Without having that fragment annotated with browser qualifier, Graphene will resolve it against @Default browser instance.
11. JavaScript Interface
In testing of complex examples, it is often needed to perform custom JavaScript code. For this purposes, there is implemented JavaScript interface mechanism providing you a mapping of Java interfaces on JavaScript objects.
11.1. Basic Usage
11.1.1. Preparation
First, you need to create a file containing needed JavaScript code.
The code has to create an object and store it to a global scoped
variable (e.g. window object property) and the file has to be
available on the test classpath. Here is an example of such file:
window.helloworld = {};
window.helloworld.hello = function() {
  return "Hello World!";
};
Now you can create a Java interface:
@JavaScript("window.helloworld")
@Dependency(sources = "helloworld.js")
public interface HelloWorld {

    String hello();

}-
@JavaScriptdefines a JavaScript object used for mapping,window.helloworldandhelloworldrepresent the same object in this context. -
@Depedencydefines dependencies on files containg JavaScript code. In this case we want to ensure that thehelloworld.jsfile is loaded to the page.-
source files are resolved from the test classpath, so in a Maven project, you want to put those in
src/test/resources/helloworld.js -
The
@Dependencyis indeed optional, you can map the objects from the application under test JavaScript objects.
-
11.1.2. Construction and Usage
To use your JavaScript interface put an attribute annotated by @JavaScript annotation to your test class:
@RunWith(Arquillian.class)
public class TestCase {

    // Required browser injection
    @Drone
    private WebDriver browser;

    @JavaScript
    private HelloWorld helloWorld;

    @Test
    public void testHelloWorld() {
        assertEquals("Hello World!", helloWorld.hello());
    }


}
11.1.3. Default Getters And Setters
JS interfaces functionality is often used for retrieving custom values of custom JavaScript objects. Therefore, there is a reasonable default in the form of getters and setters methods implemented for you.
That is why you can do just following in order to retrieve the someVariable value:
document.someVariable = '';@JavaScript("document")
public interface GetterAndSettersShowcase {
String getSomeVariable();
void setSomeVariable(String valueToSet);
}No need to implement get/set in the JavaScript code. Graphene will do it automatically.
11.2. More Advanced Stuff
You may need to execute some code after the JavaScript file is loaded to
the page. Just place it into the install() method of your JavaScript
object and extend InstallableJavaScript in your Java interface. Also
you can define dependencies on other interfaces. Graphene ensures the
install() method is invoked and all dependencies are loaded before you
invoke a method of your interface.
// object registration
window.greeting = {
  install: function() {
    // installation setups the greeting value accessed later by helloworld object
    window.greeting.value = "Hello World!";
  }
};window.helloworld = {
// return a greeting value
hello: function() {
return window.greeting.value;
}
};@JavaScript("greeting")
@Dependency(sources = {"greeting.js"})
public interface Greeting extends InstallableJavaScript {
}@JavaScript("helloworld")
@Dependency(sources = {"helloworld.js}, interfaces = {Greeting.class})
public interface HelloWorld {
String hello();
}
Graphene uses Page
Extensions to install needed dependencies for your @JavaScript
interface before each method invocation. Before the installation is
processed, it checks whether the object used for mapping is defined. If
so, the installation is skipped. It means if you use (for example)
document object for your mapping, dependencies won’t be installed
(including sources).
|
| When a page is reloaded, all installed JavaScript code is dropped and installed again if needed. It means the state of JavaScript objects is not preserved. |
11.3. Customization
If you are not satisfied with installation via
Page Extensions,
you can implement your own ExecutionResolver containing
the following method:
Object execute(JSCall call);Don’t forget to reference it in your @JavaScript interfeaces:
@JavaScript(value = "mapped.object", methodResolver = YourOwnExecutionResolver.java)
...
12. guardAjax(input).sendKeys("abc");
12.1. Issue
-
The guard does not work correctly - i.e.
-
it timeouts
-
or it ends prematurely (when page is partially updated)
-
12.2. Analysis
-
sendKeysbehaves as you would expect from a real user interaction - several characters are typed sequentially, which is accompanied by appropriate number of keydown/keypress/keyup events and it does not fire any blur event -
guard actually wraps exactly one XHR request, which is triggered by appropriate user interaction
12.3. Solution
-
If your application triggers AJAX request when blur happens, then you need to guard blur event (either click to another input or to body element):
-
input.sendKeys("abc"); ``guardAjax(body).click();
-
-
If your application triggers AJAX request when keydown/keyup happens, then you need to wait for a last update:
-
input.sendKeys("ab"); guardAjax(input).sendKeys("c");
-
13. Advanced Techniques
Advanced techniques covered in this section include:
13.1. Graphene Context And Proxy
Graphene stores WebDriver instance in the thread-local context, distinguished by browser qualifier.
It enables you to write framework-like features where context of the browser is injected just when you need it:
13.1.1. Accessing
To access a browser session, you can obtain proxy of the context, which is proxy object which delegates the methods you call on an instance which is at the time available in the context of current thread.
The most generic form is by obtaining instance of the WebDriver:
WebDriver browser = GrapheneContext.getContextFor(Default.class).getWebDriver();The Default.class representas a browser’s qualifier - in this case we are requesting default browser (when no qualifier is specified on Drone instances). Read more Parallel browsers.
You can also use alternative methods, most notably the method which provides proxy object implementing given extension interfaces:
JavascriptExecutor executor = (JavascriptExecutor) GrapheneContext.getContextFor(Default.class).getWebDriver(JavascriptExecutor.class)13.2. Page Extensions
| The Page Extensions SPI is not yet available for public use, we discourage you to use it yet. |
Page extensions mechanism provides a way to easily install your JavaScript code into the page. Page extensions are used mainly in cooperation with JavaScript Interface, but they can be used independently too.
13.2.1. Basic Usage
Own Extensions
Extensions has to implement PageExtension interface to define:
-
name,
-
JavaScript code to be executed when the extension is installed,
-
JavaScript code returning true if the extension is already installed, false otherwise,
-
dependencies.
SPI
To provide your own extensions you can use PageExtensionProvider
service containing the following method:
// returns a list of extension for the given test class
List<PageExtension> getPageExtensions(TestClass testClass);
Registry
The second way to provide your own extension is to use
PageExtensionRegistry:
PageExtension pageExtension = new MyCoolPageExtension(...);
GraphenePageExtensionsContext.getRegistryProxy().register(pageExtension);
The registry can be also used to check whether the given extension is available:
// returns page extension with the given name, or null if there is no extension with the given name
GraphenePageExtensionsContext.getRegistryProxy().getExtension("my cool extension");
Installation
Each extensions is defined with its name. When you want to install the extension just ask for its installator and install it. All defined dependencies will be installed too. When the extension is detected as already installed, the installation is skipped (including installation of all dependencies).
GraphenePageExtensionsContext.getInstallatorProviderProxy().installator("extension name").install();| The installator is available only for extensions already registered via SPI or registry. |
| When a page is reloaded, all injected JavaScript code is lost, so the extension has to be installed again. |
13.3. Graphene Interceptors
| Interceptors are not officially part of 2.0 and thus they are not available for production use yet. |
Graphene Interceptors concept is inspired by Java EE Interceptors feature. It is a way how to create interceptor classes and methods that interpose on method invocations.
13.3.1. Basic Usage
An example of interceptor usage can be a need to take a screenshot of
the browser window and its saving after the every method invocation on
the injected WebDriver instance. Building an interceptor is simply
a matter of writing a Java class that implements
the org.jboss.arquillian.graphene.proxy.Interceptor interface.
import org.jboss.arquillian.graphene.proxy.Interceptor;
import org.jboss.arquillian.graphene.proxy.InvocationContext;
import org.foo.bar.ScreenshotTaker;

public class ScreenshotTakerInterceptor implements Interceptor {

    @Override
    public Object intercept(final InvocationContext context) {
        ScreenshotTaker.takeScreenshot();
        return context.invoke();
    }
}
Each implementor must satisfy, that in the intercept method body will
be called at least once method from current context:
InvocationContext#invoke().
|
Secondly, the interceptor needs to be registered. Currently this can be achieved like in the following listing:
@Drone
WebDriver browser;

public void beforeSomething() {
    GrapheneProxyInstance proxy = (GrapheneProxyInstance) browser;
    proxy.registerInterceptor(new ScreenshotTakerInterceptor());
}
In the example above the interceptor was registered to the WebDriver
instance, thus all method invocations on that object will be
intercepted. Note that you can register the interceptor to any object
which can be casted to GrapheneProxyInstance. For instance to Page
Objects.
|
You can use GrapheneProxyInstance#unregisterInterceptor method to
unregister previously registered interceptor.
|
Have an inspiration in StaleElementInterceptor
(here),
Graphene way of protecting the elements from
StaleElementReferenceException.
14. Project Info
Type: |
Maven |
Source Code: |
|
Issue tracking: |
|
Forums: |
|
License: |
LGPL v2.1 or ASL v2.0 (dual-licensed) |
14.1. Getting Started Guide
Apart from the documentation available here, there is also a comprehensive guide Functional Testing using Drone and Graphene to help you leverage the benefits of Graphene for writing robust functional tests.
15. Contributing
Community contributions are essential for maintaining the vitality of the Arquillian project.
Contributing to the project helps to deliver functionality you need and allows you to share your code with other contributors and users.
We want to keep it as easy as possible to contribute your changes and we will work hard to deliver your contributions in an upcoming release.
Please refer to How to Contribute to find related instructions.